 Wiring your electronic sprinkler valves is certainly within the realm of most homeowners. If you don't feel comfortable doing it you can always ask your handyman, but for the most part it is following colors on the wiring and connecting the wires.
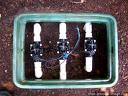
Each electronic sprinkler valve will have two wires coming out of the solenoid. One wire will get connected to a white "common" wire and the other wire will get connected to an individual wire connected to the sprinkler timer control box. Each wire coming out of the cable connecting the sprinkler valve manifold to the timer will be a different color.
To wire the timer, just attach an individual wire to each of the station terminals you plan to use. For example, if you have four sprinkler valves, you will strip the ends of 4 wires and attach one to each screw terminal. The white wire is always the common wire and must be attached under the screw terminal marked "common" or "com".
Now go to the sprinkler valve manifold and whichever color is attached to the timer's first station terminal, connect one wire of the sprinkler valve to this color. Strip the insulation from the end and use water proof wire nuts. Do this for each sprinkler valve, attaching only one wire of each valve to each different color wire corresponding to the timer station screw terminals.
Once each sprinkler valve has one wire connected, take the remaining wire of each valve, strip the insulation, gang them together and attach them all to the white common wire coming from the cable, again using a waterproof wire nut. Now you can program the timer to run.
Have you ever lifted up the cover of your sprinkler box? The first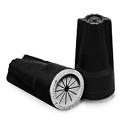 thing this handyman notices is all the bugs that scatter when they see daylight. You might also notice a tangled mess of wiring that may or may not be laying in water. This water can be a big source of problems for the wire connections, not to mention the fact that you have a leaking sprinkler valve.
When sprinkler valves are wired together, it is common for most homeowners to use regular wire nuts. These do a great job of holding the ends of the wires together, but not so good at keeping water out of the connections. For this you can use water-proof wire nuts.
Water proof wire nuts are larger than standard wire nuts and are filled with silicone to form a barrier against water infiltration. With standard wire nuts there is a female threaded fitting inside the wire nut and all you need to do is stick the wires inside the nut and screw it on. This twisting action joins the ends of the wires and hold them for a good connection. With water proof wire nuts, I generally hold the ends of the wires together with pliers and twist them together before sticking them into the wire nut. At least in my mind, I want to disturb the silicone filled wire nut as little as possible. Once inserted into the wire nut, I will give it a gentle twist and then use black electrical tape at the base of the nut to hold it to the wires so that nothing moves. This will also form another barrier against water.
It's a sad sight when your handyman lifts the top off of your sprinkler box and it is full of water. You likely have a sprinkler valve or fitting leak...and it's leaking 24/7. You will need to troubleshoot the leak and fix it.
Turn the water off at the main and, using a paper cup, start removing as much water as you can. You will have to wait for the rest of the water to be absorbed into the ground. Once the water is gone, turn the water back on and race over to the box to see where the leak is. Then you can turn the water off and go to work. If the leak is at a fitting, you will have to cut the pipes and reglue a new fitting in. This is not easy since the box will be small relative to all the pipes and valves in it. Use PVC primer and glue.
If the leak is caused by a spinkler valve, carefully check where the leak is located. It is often the case that when the valves are initially installed, there are placed so close together that you can't unscrew them from the fittings. This of course is a problem if you have to replace one.
If the leak is coming from the top of a sprinkler valve, don't replace it. Instead, go buy an exact replacement valve, and strip it for the parts. You can unscrew the top half of the valve which will include the diaphram, solonoid and cover, and screw the top onto the old valve body. Essentially you will have a new valve without all the headaches of cutting it off of the old piping and re-gluing it.
 We got a call today for a sprinkler repair...a customer was having all kinds of little geysers spray up around his desert landscape when the sprinkler system turned on. Desert landscape will have black poly tubing that supplies water to individual plants through drip emitters. These emitters deliver a specified amount of water to each plant. They are rated at gallons per hour (gph) and most commonly go from 1 gph on up, although you can buy emitters that deliver less or much more.
Drip emitters, and black poly tubing, are not glued together. Rather they are held together with barbs. The fittings and emitters have barbs and as they push into the tubing, they grip the inside of the tube to hole everything together...unless the water pressure is too high.
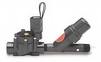
In this case, whoever installed the drip system didn't install a filter and pressure regulator. The pressure regulator will lower the incoming water pressure down to around 25 psi. Without the pressure regulator, the drip emitters will blow off of the tubing, which was what was happening here. The fix here was to install a filter and a pressure regulator.
Another source of the geysers are pets. Dogs love to chew on the drip lines and emitters. Try to keep the tubing buried by the landscape rock and keep the emitters close to the base of the plant.