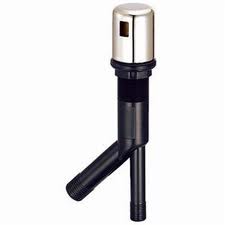
 A dishwasher air gap sits in between the drain hose and the end point where the water drains out (typically the garbage disposal). Some people don’t install an air gap and instead just connect the dishwasher drain hose directly to the garbage disposal inlet. That’s a no-no.
It is not difficult to install an air gap for the dishwasher. You will need about $20 in parts and about an hour of your time.
You will need the air gap itself, a hose that runs from the air gap to the dishwasher, and a handful of hose clamps to hold everything together. Ideally you need a hole in your sink or countertop for the air gap to sit (although some people will just attach the dishwasher drain hose to the underside of the sink creating a “high loop).
Under the sink, connect the dishwasher hose to the small inlet of the air gap with a hose clamp. Connect the larger outlet of the air gap to the discharge hose that you bought and the other end to the garbage disposal inlet (be sure you remove the knock-out plug from the garbage disposal first) and secure everything with hose clamps. Push the air gap into the hole in your sink or countertop and screw on the retaining nut. Then you can install the decorative cover over it. Run the dishwasher’s “rinse and drain” setting and check for proper operation.
 A garbage disposal can easily get jammed if a coin drops into it. Most of the time we see this with children throwing coins into the sink. I don’t know what the fascination is with kids and garbage disposals…maybe it is that they are loud and make things disappear (yes, both kids and disposals).
Removing a coin usually means removing the disposal from the sink. Plenty of people though, will choose to just stick their hand down there and feel for it. Please, if you feel the need to do this, unplug the disposal and make sure it can’t start.
Removing the disposal means removing the discharge pipe on the side and probably removing the air gap hose just above the discharge pipe. Loosen the collar that holds the disposal to the underside of the sink and the disposal should drop right into your hands. Pull off the rubber splash guard and look into the disposal. A flashlight helps to find the coin but it usually gets wedged in between the wall and the bottom plate of the disposal. You may be able to reach in and grab it, or you can use an allen wrench in the bottom of the disposal and try to work it loose. Jiggle the allen wrench back and forth while you have the disposal turned upside down. When you hear the coin fall, you are done.
You can also try a large standard screwdriver. Turn the disposal on its side and wedge the screwdriver at the side wall to give enough clearance for the coin to drop out.
 The first sign that your garbage disposal hose is kinked, or restricted, is probably that you have water on top of your counter. A restriction, like a kinked hose, will reduce the flow of water and cause it to back up and out of the air gap on top of your sink.
This path starts at the dishwasher drain line. The drain line goes from the dishwasher up to the air gap device on top of your counter. The air gap then connects to the garbage disposal via this hose, that happens to be kinked. So how do you fix this?
You can either replace the hose, or trim it. If you choose to trim the hose, loosen the clamp on the disposal side of the hose (it is easier to get to). Use a utility knife and make a nice square cut and then reconnect the hose. You might find that you have to trim the hose further or even rotate it to flatten out the kink.
If you choose to replace the hose, you will disconnect the clamps on both sides of the hose and then slide the new hose on the fittings. Place the clamps over the hose and the fitting and then tighten until snug. You will have to play with the length of the hose to make sure it doesn’t kink as well.
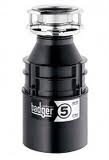
 Can I replace my garbage disposal but not the old collar that holds it to the sink? It is a pretty common question. The answer is that it depends.
Garbage disposal manufacturers don't do a whole lot in the way of design. After all, the disposal just sits in a cabinet out of sight and it can afford to be ugly...as long as it grinds up food.
For the most part, yes you can leave the old collar in place and just install the new disposal onto it, as long as it is from the same manufacturer as the old unit. For example, if I had a new Insinkerator disposal to replace my old Insinkerator disposal, and the old collar was tight and not leaking, I would feel comfortable doing that. However, if my new disposal was not an Insinkerator, I would replace the collar.
The biggest gripe about replacing the collar is the snap ring. Although it seems like you need 15 hands to get it into the groove, if you start at one end and gradually pull it down, it will eventually snap into place.
Replacing the collar will only add about 10 minutes onto the job and you know that the new disposal will propertly mate up with the new collar.
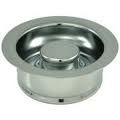
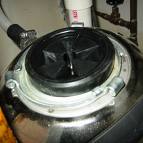
 If you look down into your garbage disposal, you should see a black rubbery gasket. This is a splash guard. This blocks debris from flying out of your sink when you use your garbage disposal. Every once in a while, you will need to replace this part. They shouldn’t wear out, but people seem to like pushing food down into the disposal with utensils that can damage the part. I guess the message is don’t use a fork to push eggshells into the disposal. Replacing the splash guard involves removing the disposal.
Unplug the disposal and remove the bolts that hold the discharge pipe to the side of the unit. You can loosen the slipnut at the discharge pipe to retract it, which will make removing the disposal easier. You might be able to remove the disposal with the dishwasher drain line still connected, but if there isn’t enough slack it it you will need to remove it. Use a screwdriver and slip it into the collar and loosen it. The lugs will disengage and the disposal will drop off of the sink…so support it while you turn.
With the disposal off, simply pull the splash guard from the top of the unit and push the new one on. The splash guard gets compressed between the disposal and the sink flange. Remounting the disposal is a reversal of the steps that you took to remove it. Once you lift the disposal up to the collar, tighten the lugs partially until you align the discharge opening with the discharge pipe. One you connect the piping back, you can fully tighten the lugs that hold the unit to the sink. Then just plug in the cord.
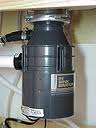
 When installing a garbage disposal, you will have to make electrical connections underneath the unit. You certainly want to do this prior to installing the disposal after flipping it upside down. There is a small metal door that is held in place with one screw.
After removing the small door, you will thread the cord through the access hole and out the opening so that you can twist the connections together with wire nuts. Once the connections are made, the wire nuts get pushed back into the unit and the door gets replaced. However, the opening for the cord to exit the bottom of the unit has sharp edges and the concern is that these sharp edges over time may cut into the cord and cause a short or spark. This could be problematic. The fix is to add a grommet or cable clamp to protect the cord and prohibit any movement against the sharp edges.
A rubber grommet grips the perimeter of the opening, while a cable clamp is held on to the opening by screwing on a nut from behind it. It will need to be installed prior to installing the cord as the cord will be threaded through the clamp. After you make the wiring connections, tighten the clamp screws so that the cord is held in place firmly, but don’t over tighten.
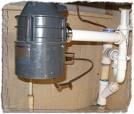 A garbage disposal blockage is very common. When the kitchen sink backs up only on the side with the garbage disposal, you can investigate that side only. If it was a drain clog, both sides of the sink would be full of water, as both sinks tie into the same drain line. Since only one side is backed up, the problem is isolated to that side only.
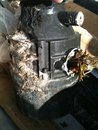
The problem I see most often, is that someone threw something down the garbage disposal they shouldn’t have. Most recently it was potato peels. You would think people would use common sense and at least consider the possibility that these types of items can cause a backup.
Usually the disposal will grind up the pieces small enough to exit the disposal, but maybe not get past the restrictor pipe. Some, but not all garbage disposals have a pipe that reduces the inside diameter. This is by design and will cause a backup at the location of the pipe where it connects to the drain.
The fix here is to clear the pipe of the debris. Set a bucket below the area to catch the water as it runs out of the pipe and let the water drain out. After the water has drained, remove the section of pipe and dump out the debris. Reconnect the piping and run water to test for leaks.
No offense to cavemen, but let's face it, there are times when we just don't have all the available tools to do the job. I get calls like this everyday, where the garbage disposal doesn't work at all or, if it does, it just hums or buzzes. That is a sign that it is jammed. There is reset button on the side of the disposal or underneath it that should restart the motor, but this will likely just get it to make a humming noise.
When a disposal is first purchased, they usually come with a tool to unjamb them...it looks like a hexagonal Allen wrench that has some lazy curves on each end. This is placed in the center hole underneath the disposal and jiggled. This will usually free the disposal up to run smoothly again. However, in a pinch go grab your broomstick and get ready to go caveman on it.
Place the broomstick in the opening of the disposal...you won't need to remove the disposal from the sink. You want to place it behind one of the blades in the disposal's grinding chamber. You will have to feel for them with the broomstick. It doesn't matter which way you push, either clockwise or counter-clockwise. With some quick, short bursts, try to force the blades to move one way or the other. You don't want to push outside the plane that the blades operate in either, as you might dislodge the disposal from the sink. You may have to alternate directions to free it up, but it should work with a little persistence.
 Look into your kitchen sink down at the garbage disposal. You should see a black folded rubbery thing with a hole in the middle of it. This is called a splash guard and allows it so that you can push food down into the garbage disposal, but keeps flying food from exiting the disposal grinding chamber. I know I'm guilty of scraping food off my plate into the sink and, after it piles up in the sink, pushing it into the disposal for grinding. Most people push the scraps on down with whatever is in their hand...a fork, knife, or spoon. Well if you fork or knife is pointed in such a way that it contacts the splash guard, it will tear.
Replacing a splash guard is done frequently by this handyman, but the job is easily performed by the average homeowner.
Unplug the disposal to stop the flow of power to the unit, even though the switch if in the off position. The disposal will need to be lowered from the sink bottom by at least a few inches to free the splash guard, as it is sandwiched between the top of the disposal and the underside of the sink. You will need to relieve the tension at the discharge pipe at the side of the disposal, so either remove the pipe via the two screws at the side of the disposal, or remove the other end of the piping further down the drain via the slipnuts. I use a small screwdriver to loosen the mounting collar at the top of the disposal.
Once the collar is loose, I place my knee under the disposal to set it on for the few seconds it will take to remove the old splash guard and place the new one on top of it.
After you have the new guard on, just tighten the collar and reinstall the discharge pipe.
 I'm sure there are many ways to screw up a garbage disposal, but here are 6 common ones.
1. Don't Remove The Knockout Plug
When installing a new disposal, if you have a dishwasher you are supposed to remove a small plug in the side of the disposal inlet. This allows the dishwasher to drain into it instead of draining out of the air gap and onto your counter. When someone calls saying they have water on the countertop, I always ask if the disposal is new. If it is new, whoever installed it forgot to remove the plug.
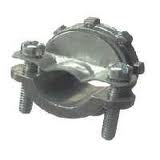
2. Don't Trim The Airgap Hose
This hose runs from the air gap (that little nubby thing on top of your counter) to the garbage disposal and is made of thick rubber. If this hose is even slightly too long, it will tend to crease and obstruct the flow of water as the dishwasher drains. You guessed it...more water on your counter.
3. Don't Fully Tighten The Disposal's Collar
Where the disposal mounts to the underside of the sink is a collar will little tabs around it. These round tabs allow you to stick a screwdriver in and fully tighten it until it "bottoms out". Well a disposal vibrates as it grinds, especially when it's full of food, and if the collar isn't totally tight, the disposal could work it's way loose.
4. Grind Things You're Not Supposed To
We all know that there are foods that don't belong in a disposal. Grind them at your own peril. Things like potato peels and celery are kryptonite to a garbage disposal. These types of things will cause a backup and lots of unpleasant smells.
5. Let Food Scraps Pile Up In The Disposal
You have a disposal, right? Then turn it on! It is surprising to me how many people will put food down there but won't grind it up. The smell of rotting food will make you run.
6. Don't Upgrade To A Stronger Disposal
For another $20.00 you can go from a 1/3 horsepower disposal to ½ horsepower. The money is well worth it. A stronger disposal will plow through things that the weaker one will not, and that means you get to unjamb the weaker one or call someone who can.