 The other day we were working in a 50 year old house whose bathroom faucet at the bathtub would not stop running. This is a case of replacing (or rebuilding) the stem and seat. The stem is attached to the handle and rises up and down. At the end of the stem is a washer that pushes against a seat to stop the flow of water. Over time, this washer will wear down, or the seat will develop pits that won't allow it to stop the flow of water anymore. These parts need to be repaired or replaced.
So after you turn the water off to the house, prepare for some fun.
1. Remove The Old Handle
This isn't as easy as it sounds. Usually a screw is removed and the handle pops right off. Well in older plumbing, the handle can seem like its welded to the stem. In this case a handle puller can help remove the handle...or break it trying.
2. Remove The Old Stem
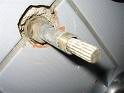
Removing the old stem can be a leap of faith. A deep well socket and a breaker bar will usually extract it, but you just hope that nothing else breaks. Once we got the old one out, it was time to go hunting. This stem was nasty and difficult to identify. After searching, we were not able to find a replacement for it. Instead we bought new parts and rebuilt it. But that only solves half of the problem.
3. Replace Or Resurface The Seat
The faucet seat screws into the faucet body and has a hole in the center of it. In this hole you insert a seat wrench to remove the seat and replace it with a new one. If you can't remove the seat, you can use a seat resurfacing tool to smooth out the surface so that the stem washer can stop the water.
Once you reassemble the bathroom faucet, the it should operate as it did 50 years ago. Many modern showers use a single handle to control the hot and cold. Here is how to replace a shower cartridge.
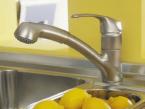
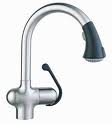 While at a neighbor's house, I noticed a very nice kitchen faucet with a pull-out spout that allow them to spray both sink basins. I'm guessing this was a $400.00 faucet. The husband installed it but he couldn't pull the spout out very far and he didn't know why. Looking below the sink told the story. Sometimes it seems that a las vegas handyman never has free time.
Faucets with pull-out sprayers are more expensive as the sprayer pulls out of the faucet itself, not the kind that sits next to the faucet. You end up having the hose run through the faucet and loop into the sink cabinet only to reconnect to the body of the faucet. So you have this hose that loops down to the cabinet floor and back up, and it tends to get caught on everything under the sink. Most commonly, it will get caught on the drain piping or the water shut-off valves.
Most manufacturers will include a small weight that holds the sprayer head into the faucet body. Without this, the sprayer head would typically just pop out of the faucet and dangle in the air. This weight comes in two pieces and just sandwiches around the hose about 6 inches from where it changes direction and begins to loop back upward.
The neighbor had 2 problems. He didn't have the weight installed on the hose (because he didn't read the instructions), and the hose was getting caught on the discharge pipe to the garbage disposal (here are some general instructions on how to install a faucet).Adding the weight was an easy fix, but I also had him add a small section of hollow PVC piping over the hose. Yes he had to take apart the faucet sprayer to slide the 10" pipe over the hose but the problem is solved. The hollow pipe provides a barrier so that the hose can't get tangled when it is being lifted out of the faucet. Since it is under the sink, nobody will ever see it.
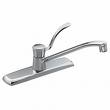 A customer's kitchen faucet leak was driving her crazy. It was leaking around the handle and she was ready to surrender. Kitchen faucet leaks can come from several places which makes fixing them a little more challenging.
If your faucet leaks from underneath the sink, it may be corroded and you will likely be buying a new one, or may be a water supply line in need of repair. If the faucet leaks out of the end of the spout when the handle is shut off (particularly with a single-handle faucet), you probably need a new cartridge in the faucet.
This customer's faucet was a single handled Moen and was leaking when you lifted the handle to turn it on...is was leaking around the handle base very slowly. This usually means a problem with some O-rings that are supposed to keep water leaks at bay.
To access the O-rings, you have to remove the handle. Slide a small screwdriver under the decorative cap and remove the screw. The handle will lift right off. The spout covers the O-rings, one at the top and one at the bottom. The spout assembly will lift off of the faucet body, and you will clearly see the O-rings.
You can buy an assortment of O-rings that will replace these. Match up the correct size and place them into the grooves. I like to slather them up with liquid soap to lubricate them so they won't twist when re-installing the spout assembly. You can test it once you put the handle back on.
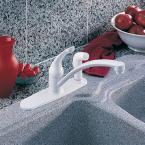 How many times have you wrestled with a loose faucet on top of your sink? It seems to happen most often with single handled faucets...as you lift the lever up to start to flow of water, the entire faucet moves to the point you almost have to hold the faucet body with one hand while to lift the lever with the other. That's not to say that is doesn't happen to faucets with separate hot and cold handles, they have their problems too.
Typically, the problem is that the nut holding the faucet to the sink is loose. You will have to crawl under the sink to access this area, but it's not difficult. Once under the sink you will see the water supply lines going up to the faucet. Look just beyond these and you will see how the faucet attaches to the sink. Some faucets have two nuts that hold the faucet to the sink, and some have one large nut that holds it down. Usually it's the faucets with the one large nut that causes the most problems.
Ideally, a basin wrench will fix this in a matter of seconds, but you can use whatever you have access to...pliers, or even a crescent wrench.
I've also seen a cheap sink as the cause. A cheap stainless steel sink (the really thin kind) will allow the faucet to move as you operate it. Although the faucet may be tight to the sink, the thin sink will flex to the point that it seems the faucet is loose, but its not.
For bathroom sink widespread faucets that have two handles, sometimes the handles feel loose. For these types of handles, if the nuts under the sink are tight, try using your hand and turning the handle body clockwise above the sink. That should tighten it up nicely; this also works for bathtub widespread faucets.
If you are tired of the old faucet, here is some information on how to replace a faucet.
 It's Saturday morning and your laying under your sink, cursing your faucet with your scraped knuckles. After all, you just want to replace your kitchen faucet . Sometimes it seems impossible to remove the old faucet. So what do you do?
For starters, it helps to have the right tools. Some deep sinks will leave you only a few inches to access the nuts that hold the faucet to the sink. It is virtually impossible to get your hand and a tool into this small area to turn the nut. For this situation, you need a basin wrench.
A basin wrench is a skinny tool that will fit into these tiny areas. It looks like a thin piece of pipe with jaws on the end of it. On the bottom is a handle. To use the tool, just set the jaws over the nut and turn. It sounds easy , but sometimes it's not. Sometimes the handle will start to bend with the amount of force you have to apply. In that case you can place a length of pipe over the handle and turn it, effectively increasing the amount of leverage you can apply to the nut. You can also use the basin wrench to install the nuts on your new faucet.
If this fails and you have the room, you can try a nut splitter (place the tool over the nut and turn the handle). You can also try to cut off the faucet and or nuts from either on top of the sink or beneath it.
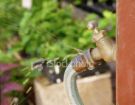 If you've ever had a dripping hose faucet (aka a hose bib) handle , you know how frustrating it can be. You can turn the handle as hard as you can and yet it still won't stop leaking around the handle. This is true for washing machine hose faucets as well. Sure you could replace it, but try a quick repair first.
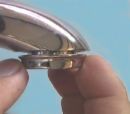
The handle is attached to the faucet via a cap. This cap screws onto the hose faucet. The first thing I would try is to tighten this cap by a quarter-turn. This may stop the leak, but you may notice that it is harder to turn the faucet on-and-off. Personally, I can live with that.
Underneath this cap is the secret to no leaks: packing. Packing looks like a small rope made of Teflon, and it comes in a variety of diameters. You wrap this packing around the stem and as you tighten the cap back down everything compresses to seal out any leaks. If you add packing and it still leaks you can add a little more.
Had the faucet leaked at the spout (where water is supposed to run out), you could have tried to disassemble the faucet and replace a washer, or just replace the hose faucet.
 There are many times a frustrated homeowner will call needing some type of faucet repair for low pressure.
This is one of those cases where you have to isolate the problem. Yes, you might end up having the faucet replaced, or a valve, or a cartridge, or a stem, etc. You're thinking big dollar signs now right? Well I would ask you some questions before I started to worry (this quick fix will typically solve 90% of low-pressure problems in bath faucets).
Here's how the dialog usually goes: (and I will be interrupted many times throughout the conversation...please, just the facts, Ma'am)
Me: "Is the problem isolated to this particular faucet?"
Caller: "Yes, but"...
Me: "Do you notice low pressure at both the hot side and the cold side when they are turned on separately?"
Caller: "Yes, but"...
Me: "Try removing the aerator to see if that makes a difference".
Caller: "The what?"
Me: "The aerator. It's that thingy at the end of your faucet's spout where the water actually comes out".
Caller: "OK, how do I get it out?"
Me: "You grab it with your fingers and unscrew it"
Caller: "That's it?"
Me: "That's it"
Actually, removing the aerator is only half the battle. Then it is going to take you another 5 seconds to clean out the gunk caught in the screen, and an additional 2.7 seconds to screw it back into the faucet.
Now some people will want to make a project of cleaning the aerator. Just dump out the debris and maybe poke out the gunk in the screen with a pin. If you want to get really fancy, you can soak it in vinegar or CLR. Heck, go crazy and lay out $2 for a new one. It's up to you.
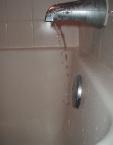 Nothing says relaxing weekend like doing some tub faucet repair. If you have a single handle that controls both the hot and cold water, you simply replace the cartridge. For faucets with separate hot and cold handles, there are a few more parts. If your faucet won't completely shut off, chances are the seat and stem are the culprit.
These items are fairly easy to replace, but you may need to buy a few specialized tools.
If the water dribbling out is warm, then start at the hot handle, and vice versa.
The handle is attached to the stem. As you turn the handle toward off, it pushes the stem against the seat of the faucet body. At the bottom of the stem is a washer that compresses against the seat and stops the water from flowing. However, the washer gets brittle and the seat wears out, and over time they won't fully stop the water.
Begin by turning off the water to the house and opening the tub faucets to let any pressure out. Pry off the handle cap and remove the screw that holds the handle to the stem. The handle should wiggle free, but in the worst case you may need to buy a handle puller for the job.
The handle puller is a goofy-looking tool but it works. Thread the rod of the handle puller into the faucet handle's screw hole and place the arms of the puller at the back of the handle. Turn the rod clockwise and the handle will pop free.
The stem will be partially hidden inside the escutcheon. Unscrew the escutcheon to gain access to the rest of the stem. Now you will be able to see the entire stem assembly.
Depending on how large the opening in the wall is and how deep inside the wall the stem assembly sits, you may be able to get a wrench around it to unscrew it. You may, however, have to buy a set of tub sockets. These look like a regular socket set, but they are much larger and much deeper.
Slip the socket over the stem assembly and unscrew it. At the bottom of the stem is the washer, which is held in place with one screw. Remove the washer.
The seat is located in the nether regions of the faucet body. If you look into the hole where the stem once sat, you will see another hole deeper into the faucet body. This is the seat and it looks round with squared edges cut into the center of it.
Use a seat wrench, stick it into the hole and unscrew the seat. A seat wrench looks like a mini version of an "L" shaped lug nut wrench for car tires.
Take all of the parts to a home center and buy replacements. You may have to go to a plumbing supply store, but a home center will have the basics.
While you are at it, you may as well replace both the hot and cold water parts. Why ruin two weekends when one will do? You might also consider replacing the entire stem instead of just the washer.
Once you have the replacement parts, apply some pipe dope on the threads of the new seat and screw it back in. Put some pipe dope on the threads of the stem assembly (called bonnet threads) and screw it back in. If you choose to replace the just the stem washer and reuse the old stem, lubricate the parts with plumber's grease and then screw it in.