 Removing a door knob is certainly a beginner repair job. If you have never done it, once you have done it you will see there was nothing to be intimidated by.
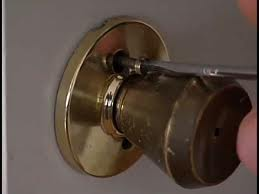
Door knobs sandwich the door and activate the latch mechanism. The hardware always secures the door knob from the inside of the door. There are usually 2 long machine screws on either side of the handle on the interior. If you unscrew these screws, the knobs on both sides of the door will pull away from the door. These screws are sometimes covered by a decorative cover. If yours are covered, use a screwdriver and pop the cover free. It will turn and you will need to align an opening in it with each screw, so that you can get the screwdriver in the screw head.
Pull the handles apart and you will see the latch mechanism sticking through the edge of the door into the door knob hole. The latch mechanism is also held in place with two screws. The mechanism is held in place in the door’s edge. Remove these two screws and you can pull out the old latch mechanism. Now you can install a new door knob and latch.
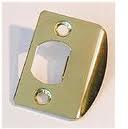
Also, you can replace the door strike plate on the door jamb. This is the curved metal piece that the door knob latch hits against as the door closes and latches. You certainly would want to replace this if you are changing the finish on the old door knob, but also if it is scuffed up, which it usually is.
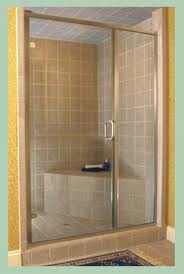 A shower door has closing problems just like any door. Sometimes they don’t close very well, whether from abuse or time. Swinging shower doors will occasionally need to be adjusted.
Open the shower door and lift it upward slightly. See if you can determine if there is any “play” in the door and if so, where the cause of it is. Usually, swinging shower doors are connected to a channel that gets screwed onto the shower enclosure from the inside of the shower. It may be that the door and channel are loose at a screw. If that is the case, Lift the door to its normal position and tighten the screws that hold the channel in place.
It may also be that the vertical support that the channel is attached to is loose. Check at the top of this hinge to see if there is any movement in these pieces. There shouldn’t be, but if there is you may have to get creative.
Also check the shower sweep at the bottom of the door. In a lot of cases, the sweep will become warped and/or loose and fall down somewhat. When it drops, the door won’t close without some effort. I would replace the sweep if that is the cause.
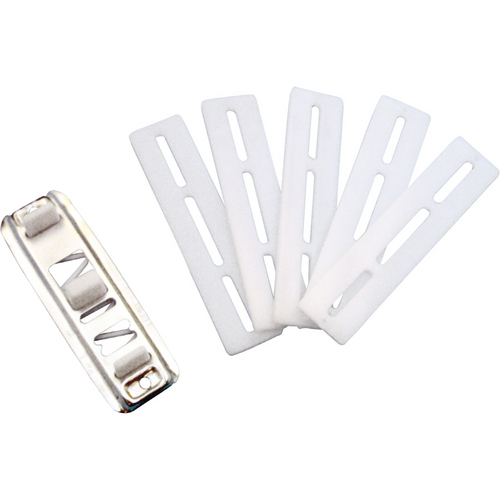 If you have had flooring replaced in a bedroom, have you ever noticed that the sliding close doors now swing? It is probably because you are missing a small plastic guide that gets installed at the floor. It likely wasn’t replaced after the flooring was done.
It also happens that these door guide will break or can get pulled out if someone gets rough with the door. The guides are not very tall, and so it is possible that you may have to either raise the divider up or lower the doors down so that they engage with the guide. You will see some carpet installers install a small block under the carpet just for this purpose. This raises the level of the floor to the point that the guide will hold the doors in the correct position.
As I said, the other option is to lower the height of the doors. There are screws at the top of the doors where they are held to the rollers. If you loosen these, the door can be lowered and then retightened.
Installing a guide is a matter of placing the guide in position (make sure it is in the middle of the opening in the same plane as the doors). It is best to close the doors and install the guide at the point where the doors overlap. It is held in place with screws.
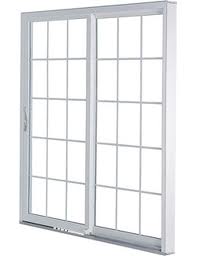 Part of getting a patio door to roll smoothly is making sure that it is level. If the door is level at least you’ve got a fighting chance. If it isn’t level, the lip of the door may dig into the track and really bind up. Additionally, you may find that the handle lock doesn’t engage anymore.
Adjusting the door for level is pretty easy. You will need a screwdriver and maybe a flashlight. At the bottom of the door are two roller assemblies, one on each side of the door. If you look at the edge of the door at the bottom, you will see a small hole. Both the front edge and rear edge will have such a hole. This is where you will stick a screwdriver to adjust the rollers either up or down.
You will have to feel for the screwdriver to engage because the rollers are recessed into the door (this is where a flashlight may give you a clue). Place the screwdriver into the hole and move it around until you feel it engage with the screw. If you want to lower the door, rotate the screwdriver counter-clockwise. If you want to raise that side of the door, rotate the screwdriver clockwise. Realize that in raising the door, you will be lifting the weight of that side of the door, and so you will have to use one hand to slightly lift the door as you rotate the screwdriver. Constantly check the operation of the door and make sure the lock engages properly before you call the job done.
 Having one cabinet door higher or lower than the others looks very strange. It is either that the hinges need to be adjusted, or maybe that the doors weren’t installed correctly in the first place.
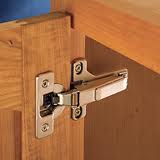
If you are lucky, you will have the adjustable European hinges. These hinges are not seen until you open the door, and they can be adjusted for and up and down, side-to-side, or front-to-back movement. It is easy and fast, and all you will need is a screwdriver.
European hinges will have two screws on each hinge that you will need to slightly loosen to adjust the door for height. These screws on the cabinet wall and are at the front of the hinge closest to the opening, at the top and bottom of each hinge.
Loosen the screws at the bottom hinge first and support the door as you slightly loosen the top hinges screws. You will feel the weight of the door in your hand when you have loosened the screws enough. Move the door up or down to your liking and tighten the screws to hold the door in place. Close the door to check its alignment with the other doors. If you are satisfied, open the door back up and tighten the screws until snug.
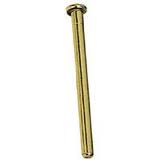 If you need to remove a door from the hinges, it’s a pretty easy process. The two leafs of the hinge meet in the middle and a hinge pin is placed through the knuckles of each half, holding them together. The pins resist the pulling pressure of each half of the hinges. The fit is fairly tight so that the door won’t have a lot of movement in it as it opens and closes.
If you need to remove the door for whatever reason, you will need to remove the hinge pin in each hinge. Depending on the doors size and weight, most interior doors have 3 or 4 hinges.
It’s probably best to partially close the door and add something underneath the door to give it some support. I usually start at the middle hinge, then do the bottom hinge, and finally the top one. Saving the top one for last will allow you to give the door some support as you remove the pin. Use a small screwdriver and a hammer and tap from the underside of the hinge. Place the tip of the screwdriver at the bottom of the pin and give it a few taps. This will lift the head of the pin out slightly. Then you can tap underneath the head to lift it up further so you can grab it and pull it out.
Try not to move the door as you are removing these. If you are lucky, the knuckles will stay aligned and will help support the door as you remove the pins.
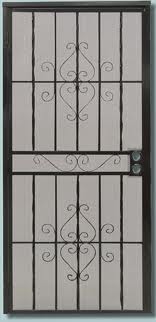 Having a security door installed by your handyman is a common job. However, if you want to tackle the job yourself, it shouldn’t take you over an hour.
Once you get the door home, it is all about placement. Determine which side the door will swing from (the hinge side should be on the same side as your home’s door) so that you don’t have to go from one side of the door to the other. You will want to check that the door knobs don’t hit each other as they protrude from the door…this will prevent the security door from locking. You can switch the position of the handle and lock to alleviate this.
Set the security door on a piece of wood or other object until the height is correct and then make some marks on the wall where the holes are located. Remove the door and pre-drill the holes for the jamb. The diameter is usually 3/16” but check to make sure another size isn’t specified.
With the holes drilled, use a bar of soap and rub it on the threads of the screws (this will act like a lubricant). Set the door back at the correct height and start screwing in the screws. Monitor your progress with a level. Once the hinge jamb is secured, install the door knob and lockset. Move to the latch side of the frame and extend the deadbolt, lining it up with the door. Install it by following the same procedure as above. Then install the head rail in the same manner.
 Whether or not you are replacing the door or just the handle, if the latch doesn’t line up with the strike plate, you have some decisions to make.
If you have replaced the door and all that is wrong is that the latch doesn’t align, I would just move the strike plate. If the door is binding along the frame, you will need to adjust it which may fix the problem anyway.
Most people find this problem just by replacing the door handle and lockset. It is a very easy and quick fix. The adjustment will be with the strike plate only. Don’t even attempt to play with the handle or lockset…just stick with the strike.
Get eye level with the latch and partially close the door until the latch contacts the strike plate. Make pencil lines somewhere on the jamb that shows the level of the latch. Open the door back up and take note to where the strike needs to be moved in relation to the marks on the jamb. It is likely only an eighth of an inch or so. If it distance is really small, you can use a metal file and file away the area on the strike. Otherwise, remove the strike, pre-drill the holes and reinstall it so that the hole in the strike matches up with the marks on the jamb. You may need to fill in the old holes with a golf tee and glue or the screw may wander back into the old location.
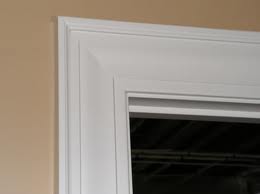 If you are replacing the door jamb or casing around the jamb, the very edge of the jamb should be exposed before the casing is secured to it. This is the “reveal”. The casing spans the gap between the door jamb and the wall and hides things like nails and shims so that all you see is the attractive wood work around the door.
I can’t say that there are any hard and fast rules on the sizes of reveals, but generally the size of the reveal is 3/16” of an inch. However, depending on the size and profile of your casing, the reveal can be larger, but I wouldn’t make it smaller. If you place the casing too close to the edge of the jamb, you can run into trouble with the hinges (this could happen if the profile is tall and the hinges are large in diameter). If you have a large door and have tall baseboard and casing, it would certainly be appropriate to extend the reveal. Play with the size until you are satisfied. The larger the material you are using, the larger you can make the reveal. By the way, it is much easier to paint the casing first and then install it. After that you can just fill the nail holes and touch up those spots. It’s easier than trying to cut around the entire perimeter.
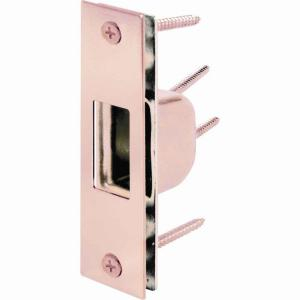 Securing an exterior door is a priority for many homeowners. If people knew how poorly some of the locking and latching mechanisms were, they might lose sleep at night. Not that the locks are bad mind you, it’s the strike plate that is the weakest link.
The strike plate is the curved metal piece that sits in the door jamb. The latch hits this and closes. The problem is that the strike is usually installed with ¾” screws into the jamb. When the door gets kicked open, the jamb usually splits from the force of the impact, and the door swings open.
A fast fix is to replace these short screws with longer deck screws so that they sink all the way into the house framing. The door can still be kicked in, mind you, but it will take more than one kick.
You can install an armored strike plate for some added sleep. These are beefy strike plates with a larger surface area to spread out more of the impact. You will need to make the hole for it into the strike jamb and then mortise the area for the surrounding lip to sit into. This will use 4 deck screws with each one long enough to screw into the house framing. The unit comes with a template to make the location easy to mark out and install. Just because you have an armored strike plate installed doesn’t mean the door is kick-proof. It just means that it will be more difficult to enter than a door without it.