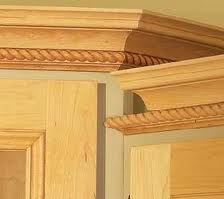
 I had some customers call about some cabinet work that they needed done. In this case it was that the crown molding at the top of the cabinet had become loose and they wanted it reinstalled. The wall cabinets hung below the ceiling with a gap between the top of the cabinets and the ceiling so that the space created a display area.
Having the crown molding look good is very important, especially since these were quality wood cabinets. Perfect corners are a must.
Since the pieces were already cut and mitered, reinstalling them would be easy, the hard work of cutting had been done. You can use a compressor and a nail gun shooting the appropriate sized nail or brad, depending on how thick the material is that you are using. Start at a corner and squeeze the trigger, making sure the edge of the molding matches perfectly with the corner of the cabinet. Continue nailing the length of molding along the top of the cabinet, realizing that the more nails you install the more blemishes you will have to fill and repair.
When it’s time to do a corner, secure the mating piece of molding along the other side of the cabinet to form the corner. I usually squeeze a small amount of wood glue along the back of the joint to make sure it stays closed. You can also fire a nail into both pieces at the corner, but this is dangerous if you misjudge the shot. If you splinter the wood, you get to do it all over again.
After adding the glue, you can use corner clamps to hold the joint together until it dries, but I like painter’s tape. Tape one length of molding, add the glue, pinch the corner together and tape the other side closed. I tape along the entire length of the joint so that it won’t pull apart. Wait 24 hours to remove the tape and you should have a perfect corner.
 A potential customer called and was wanting some specific questions answered about cabinets. Apparently, she was buying a foreclosed home that was missing a bank of cabinets on the wall. It wasn’t a huge kitchen, but the base cabinets were there and the wall cabinets were gone. She wanted to know about getting exact matches for the missing cabinets.
The house was 5 years old and although there wasn’t a manufacturer’s label on the cabinets, they were certainly builder-grade. The customer was planning on renting out the property for the long term and had no plans to move into it. She was absolutely bent on getting an exact match. In order to do that you would have to get the right color, species of wood, style and finish. That’s the equivalent of a cabinet trifecta
I explained to her that although you probably couldn’t get an exact match of the base cabinets, you could certainly get them close enough that a prospective tenant wouldn’t notice. After all, there is a gap between the base cabinets and the wall cabinets.
If you are looking for a match, you can remove a cabinet door and take it with you. You can go to home centers and specialty cabinet suppliers who will be able to come very close to the existing cabinets.
As an alternative (albeit an expensive one), you could install wall cabinets and then reface the cabinets that don’t match.
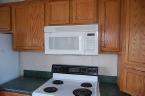
 If your dishwasher doesn't look quite right sitting in it's alcove, there may be an easy fix for it. I've seen dishwashers sticking so far out that it looks like the installer didn't push it in all the way. I've also seen them where they are pushed too far into the opening so that you really have to reach back in there to grab the handle.
So the first thing I would do is to adjust it for height. The feet are hexagonal shaped and you can twist them to either raise or lower the height of the dishwasher as it sits in the hole. It's as easy as screwing in a bolt.
The other adjustment will align the dishwasher with the front of the cabinets so that they are all in the same plane. If you open the door of the dishwasher, you will see 2 small metal tabs sticking out of the top of the dishwasher. These metal tabs will have a hole in the middle. Once you have the dishwasher where it is centered and is equidistant from the cabinets on either side of it, install a screw into each tab. This screw will go through each tab and into the wood base of the kitchen countertop (just make sure the screw isn‘t so long that it penetrates the top of the counter). This will hold the dishwasher in place and in line with the cabinets.
 Some carpentry jobs are easier for a handyman than others. For example, replacing toe kick on your cabinets. Toe kick is the piece of decorative trim at the base of your cabinets. At the base of your sink cabinet is an indentation which makes it more comfortable to stand and, for example, wash dishes. Without this indentation you would be forced to stand further away from the sink and stretch your arms out or stoop to reach the sink. Covering this indentation is the toe kick. It's called toe kick because you can kick this board with your toes as you approach it.
Toe kick on modern production cabinets is a thin decorative piece of wood that spans the base cabinets for a finished look. Behind the toe kick is either a support piece or just the edges of each individual cabinet. Without the support, this thin wood will easily break if impacted by a foot. Water damage is also a popular cause of replacement.
You can pry off the old toe kick with a pry bar or get it started with a standard screwdriver. The trick is to find the same, or close material to replace it with. Since it is recessed in the indentation, you are not likely to pick up as many differences in the appearance as it will be partially shaded by the overhang anyway.
You can buy several styles and colors at a home center or you may have to go to a cabinet manufacturer or specialty lumberyard. You may even have to stain and finish it to approximately match the surrounding cabinets. Most home center product is already finished, so that's a good place to start.
Once you cut the toe kick to length, you can glue or use finish nails to keep it in place. You can cover the corners with decorative trim pieces, which makes mitering unnecessary.
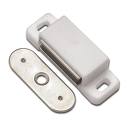 Have you ever closed the kitchen cabinet and it doesn't close all the way? Maybe the door is warped, or there is a problem with a hinge, or whatever. The answer is a catch.
A catch is a term for a mechanism that holds the door to the frame. There are many types of catches, that work with friction. For example, a female receiving piece that mounts to the frame receives a mating male piece that mounts to the door. When closed, the pieces interlock and force is required to separate them to open the door.
The type of catches this handyman likes are magnetic. They are easy to install and operate with very little effort. The magnetic piece mounts to the side or top of the cabinet frame and a flat metal piece screws to the inside of the cabinet door, so you will never see them when the door is closed.
The only thing to be careful of is that you must pre-drill the holes for the screws, especially in solid wood. Also be careful not to drill to deeply in the cabinet door. Drill just deep enough so that the hole accepts the screw, but no deeper. The last thing you want to do is drill a hold through your cabinet door.
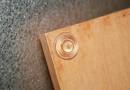 I was at a house the other day and the customer shut her kitchen cabinet door and it slammed so loudly against the cabinet that I thought the pictures would fall from the walls. It was a bare wood-on-wood sound. I looked at her cabinets and most of the door bumpers were gone. Time for a handyman rescue.
Cabinet door bumpers are those little rubbery pads that cushion the door from slamming against the cabinet. They are usually at the top and bottom of the doors, although if it is a large door, there may also be one in the middle of the door.
I don't know if it was the finish on the cabinets or cheap door bumpers, but the majority of them were missing. The cheaper door bumpers look like felt, and the next step up in quality is a bumper that looks like a stiff foam pad.
The door bumpers I like best look like clear rubber. They are firm but absorb the impact of the door closing against the cabinet and will last. These simply are peel-and-stick, but before you install them you might want to clean off the residue from the old bumper. For a few dollars you can do the entire kitchen. By the way, they also work great on drawers.
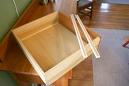 Cabinet drawers seem to be made with cheaper and cheaper material. Have you noticed that if you set something moderately heavy in the drawer that the bottom will flex? It's almost like the drawer is ready to pop out of the groove that it sits in. Well, here is a handyman fix for the weak drawer bottom blues.
Builder grade cabinet drawer bottoms are made of a thin plywood or hardwood. It sits in a groove and moves freely in it. Larger cabinet drawers are more suseptible to the bottoms bowing out from the weight and consequently benefit the most from reinforcing it.
You can reinforce the drawer bottom by using a piece of plywood. Cut a 1/4" piece of plywood to fit under the drawer bottom but leave a 1/4" gap around the perimeter of the plywood. You will need to remove the drawer and turn it over. Once you have cut the plywood to fit, use yellow carpenter's glue and glue the plywood to the underside of the drawer, leaving a uniform gap around the perimeter. The gap will allow for seasonal movement yet make the drawer bottom rock solid. Place some weight on the mating pieces until the glue cures, approximately 24 hours.
 What do you do when you discover a cabinet shelf is sagging? Well to start, it's probably a good idea to remove some or all of the weight off of it. The chances are good that it started sagging due to poor quality of the shelf material, and maybe that the shelf got wet and the weight on it started the sagging process. We see this a lot underneath kitchen sinks...a leak will develop and won't be discovered until it's too late. By that time, the water has saturated the shelf, and the weight of detergent, trash can, water filtration tanks, etc. will cause the sagging.
You can always build a stronger shelf out of ¾" plywood and put a solid edge on it. The edge acts as a brace to stiffen up the shelf. The edge can be made of 1"x2" solid wood and can be painted or stained to match the existing shelves.
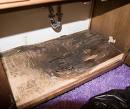
When replacing the base of a kitchen cabinet, you really have to plan on the cabinet base getting wet. At some point, there will be a leak and the floorboard will likely be exposed to water for a period of time.
Melamine is a good product to use. It is basically particle board covered by a water-resistant plastic. If water leaks into the cabinet, the wood won't be exposed to the water and won't become damaged. The challenge is that the size of the cabinet floor is fairly large. You can't get a replacement board in there without either cutting it in half or by removing the cabinet support, installing the replacement floor, and then reinstalling the support.
Sometimes the support is held in place with a plastic bracket which can be removed. The other option is to cut the support with a hand saw, install the board, and resecure the support.
Cabinet drawers can also suffer from abuse. Here is some information on cabinet drawer repair.
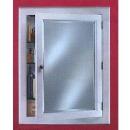 A newlywed couple purchased their first home, a foreclosure, which needs a lot of work. One of the items they want installed is a new medicine cabinet, mainly because the one they had was stolen before they took possession of the house.
There are two styles of medicine cabinets, either surface mounted or recessed. Surface mounted is easier to install but looks like an afterthought. A recessed medicine cabinet is much cleaner looking, but involves you cutting a hole in the drywall to install it.
The newlywed couple had the recessed style stolen, and so it was very easy to buy the same size, place it in the hole, and screw it to the studs. However, if you were installing one as new, you would need to cut a hole in your wall and install it. They typically fit nicely in between the studs, but you run the hazard of finding electrical or plumbing lines in the wall after you've cut it open. You will want to use a stud finder and mark off the location of the studs before you start cutting. When you do cut the wall, cut shallow so that if a cable or pipe is in the wall you won't damage it. You will either have to re-route these or find a new location for your medicine cabinet. After the hole is cut, screw it to the studs.
A surface mounted medicine cabinet installation is about as easy as hanging a picture. Find the studs, level it, and screw it to the wall. You at least have to screw it to one stud. If the cabinet is not wide enough to span two studs, use a wall anchor, such as an EZ toggle to hold it in place.
 At a customer's house, she pointed out that the end of her kitchen cabinet was water-stained. Apparently, the dishwasher had leaked in the past and stained the end panel of the cabinet. She wanted to know what could be done about it.
The end panel was stained pretty badly and the chance of sanding, staining, and finishing it to look like it never happened was slim. A better idea was to re-skin the end of the cabinet. Basically, you buy a new piece of one-eighth inch veneer and stick it over the damaged piece. This isn't as hard as it sounds. They key is matching the species, color, and finish of the wood.
If you have the manufacturer (look inside the cabinets for a sticker or tag), you can remove a door or drawer and take it to them so they can determine the correct color. If you don't have the manufacturer, take a cabinet door with you on your hunt. You can buy pre-finished panels, or you can take it to a cabinet shop and have someone make it for you. You can also buy unfinished panels from some home centers, that you will have to stain and finish to match.
Once you have the correct panel, you can cut it to fit and glue it in. Some cabinets have corner pieces you can remove, install the new end panel, then re-install the corner pieces. This will cover any unsightly edges.