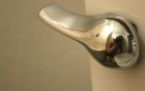
 At a customer’s house today, she was complaining of her toilet handle sticking as she would flush the toilet. I removed the toilet tank lid and the handle was not normal. From the outside, the handle looked like every other handle in a 10 mile radius, but on the inside of the tank, it was plastic and was bent towards the tank. So, when she would flush the toilet, the handle would scrape the inside of the tank and get caught in the full open position. This allowed the water to continually run down the drain and the tank would never refill unless she manually pushed the handle back into position. This naturally was a source of frustration to her.
There are a couple of solutions here. The first, and cheapest, is to modify the handle inside the tank. Since it was plastic, I picked up the weapon of choice (a hacksaw) and cut off the part that was rubbing on the tank. This shortened the lever, but left a few holes to choose from to reinstall the chain leading to the flapper. The lever was still long enough to be positioned over the flapper and so it worked naturally with little extra effort.
The other option was to replace the handle. Here is an article on a toilet repair on how to replace a toilet handle.
 Loose toilets are a part of my everyday life. The fix for a loose toilet is typically a replacement of the wax ring and bolts. Specifically, one or both of the bolts that hold the toilet to the floor will corrode and break causing the toilet to move under the right conditions. Occasionally, we will find that the toilet flange that holds and conceals the bolts will crack and consequently not be able to hold the toilet to the floor. That means a loose toilet.
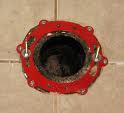
The toilet flange has a series of slots and holes in it that allow the toilet bolt heads to be inserted and moved into the correct location. The drain is located in the middle of the flange. These slots and holes will corrode and crack and the flange or ring will need to be replaced. It is much easier to use a reinforcement ring, aka repair ring, to secure the flange and ultimately the toilet in place.
A reinforcement ring bolts right over the top of the old flange, but get the toilet out of the way and clean off the old wax. If the flange is mounted to the concrete slab, you can screw the ring into the slab using concrete anchors. Depending on the concrete anchor you choose, you may need to cut off any part of the threaded bolt so it doesn't obstruct the re-seating of the toilet. You can also try a tapcon bolt after pre-drilling the hole for it. If you are installing into a wood sub-floor, you can use wood screws to bite into the wood. Screw the ring into place after lining it up over the broken flange. Then you can work on your toilet replacement for a secure installation.
 If you suspect a toilet leak but really can't pinpoint it, all you have to do is head towards the kitchen pantry. I know what you're thinking. Why head to the kitchen pantry when the toilet is in the bathroom? Because that is where the food coloring is.
There are kits you can buy to tell if you have a toilet leak from the tank to the bowl, but they are basically a means to color the water in the tank to see if you get some bleed through into the bowl. You can certainly buy one of those kits, but food coloring will accomplish the same thing, and you probably have some in your pantry.
Here's how you do it...after you flush the toilet and the flapper drops back down to start refilling the tank, add some drops of food coloring to the tank (you will have to remove the tank's lid for this). Add enough drops to color the water. Darker colors are easier to see. After you wait 10 minutes, look into the bowl to see if you have any colored water in the bowl. If you do, you have water escaping from the tank into the bowl when it shouldn't be.
To fix the problem, you might want to start with replacing the flapper and fill valve and repeat the test. If you still get colored water in the bowl, try replacing the flush valve.
A slow filling toilet tank is frustrating. You flush the toilet and five minutes later the water is still running to fill that tank. Assuming the float in the tank is set correctly, I would focus on either the water supply valve or the toilet fill valve. In my experience, the problem is usually with the fill valve. The fill valve is connected to the water supply line that exits the wall beneath the toilet tank.
The very first thing to do is to make sure that the water supply valve (aka angle stop) at the wall is opened fully. If it is opened only partially, this explains why you would get a low flow of water to the toilet. Turn it counter-clockwise until it stops. If it is already fully opened, you need to test it to make sure it is not clogged. Turn the valve off and disconnect it from the bottom of the tank (this is where it connects to the toilet fill valve). Point the hose into a bucket and open the angle stop you should get good water pressure spraying into the bucket. If not you can replace the angle stop to fix the problem. If you have good water pressure, I would replace the fill valve.
A fill valve can get choked up with scale and slow the flow of water. The next step to fix the problem is to replace the fill valve.
 I am a Las Vegas plumber. If you have a poor flushing toilet, you can spend a lot of time and frustration trying to diagnose the problem...and still may not figure it out. A good flush relies on good water volume, good siphoning action (for a traditional gravity-fed toilet), an open drain, and a clear vent to allow air into the system. If you are not getting enough water in the toilet bowl quickly enough, you're probably not going to have a very strong flush.
This can be the result of several things. Most people would be quick to replace the toilet flapper, or at least adjust it so it stays up longer and allows more water into the bowl. However, there is another possibility that people don't consider.
On the underside of the rim of the toilet bowl are holes that allow water from the tank to empty into the bowl. These holes start out large and easily allow the quantity of water to pass through to push the waste down the drain. Over time though, these holes can develop scale and deposits and close substantially. You will need a mirror to see these holes.
A small folding cosmetic mirror works well. You can hold the mirror at an angle slightly below the rim and see the holes. Straighten a metal coat hanger and pick at the holes to clear them. You will see the scale drop from around the openings. You can also buy gels that will dissolve this scale, but this will fix the flush problem quickly and inexpensively.
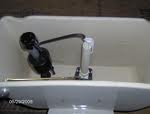
 So how many times do you look in your toilet tank? Probably not much. Well I had occasion to once I noticed a puddle of rusty water on the floor. I got on my knees and looked at the rear of the toilet and there was a stream of rusty water from the tank, slowly running down the bowl to the floor. I lifted off the tank lid and saw the culprit: balls of rust the size of a golf ball that had corroded the bolts holding the toilet tank to the bowl.
Usually you can unscrew the bolts from inside the tank, but the rust prohibited that. Sometimes you have to get creative. After shutting the water off to the toilet and flushing it to remove the water in the tank, you can remove the water supply line to the fill valve.
I removed a hacksaw blade from a hacksaw and cut the bolts off in between the tank and the bowl. The bolts are brass and were fairly easy to cut through. The other option is to try to drill out the bolts, but if you have a lot of corrosion built up on the bolts, I would go straight for the hacksaw. Be careful as the toilet is vitreous china and will crack if you try to manhandle it.
With the tank off, you can remove the corroded bolts and replace them with new ones. Use a new spud washer and place it over the flush valve opening (it gets sandwiched between the tank and bowl). Place the washers on the bolts and install them through the tank holes and finally the holes in the bowl. Make sure the holes line up or when you tighten the bolts it may crack the tank. You want an even distribution of pressure from the bolts, so make sure the holes are aligned before tightening.
Once you reconnect the water supply line to the fill valve, turn the water back on and flush the toilet several times. Check for leaks under the toilet, and particularly on the ends of the tank bolts.
 Here is a job for most any homeowner. People get curious, and in this economy, lots of homeowners will attempt to at least understand what is broken and then give it the old college try to repair it themselves before calling for help.
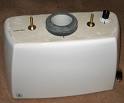
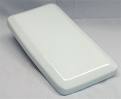
People will remove the toilet tank lid to peek inside, especially if the tank is hissing or leaking water. This is when the lid gets damaged.
A toilet tank lid is glossy and can be slippery, especially if the toilet's fill valve is spraying water on it. It is common that they can slip and fall out of your hands and break. Equally as common is leaning the lid against the wall and it slides down the floor and cracks.
You can get a generic toilet tank lid at most home centers, usually only in white. If you have a tank that has an unusual shape it probably won't fit very well. The generic lids are a basic rectangular shape with rounded corners. It will fit most tanks, but may hang over the sides a little too much. Your only option at this point is to special-order a lid from a plumbing supply house, or replace the entire tank.
Alright, we've all heard about self-closing toilet seats. As a handyman, I have to say I didn't realize how adept the toilet seat industry has become in marketing their products. They are cutting-edge marketing geniuses.
In a quick web search, I came across many terms used to describe self-closing toilet seats and the reasons we all should own one. Here are the very latest buzzwords in toilet seat technology. They are branded as: whisper-close, soft-close, self-close, quiet-close, and slow-close and can resist everything including a nuclear blast. In fact, in the event of a nuclear blast, I'll bet the only things left on the planet will be cockroaches and this special toilet seat technology.
According to these marketers, these toilet seats:
Prevent Injuries: I started shaking my head at this one, but then again this technology would have prevented my little brother from chipping his tooth when he was in potty training (don't ask).
Keep Pets Out: I guess this is good, unless you are training your cat to use the toilet by straddling the seat.
Eliminate Noise: I get this one. Nobody likes a slamming toilet lid in the middle of the night.
Increase Hygiene: Have you ever dropped your keys or phone in the bowl?
They even incorporate QRF (Quick-Release Functionality). I'm guessing this is for easy cleaning.
Doesn't it make you just want to race out to get one? If you are so inclined, here is how to install a toilet seat.
 That tiny trickle from a toilet can be frustrating for a handyman or a homeowner. It wastes water just as a bigger leak does, and can interrupt your sleep when the toilet starts to fill for no apparent reason. That's a dead giveaway that water is leaking from the tank.
There are many possible explanations for the leak, but let's start with the easy ones. Begin by making sure the float is set at a level that won't allow water to run into the overflow pipe. If the water in the tank is running into this pipe (it's the one in the center of the tank about the diameter of a quarter), then simply adjust the float level downward so that the water shuts off earlier.
The problem is usually with the flapper or flush valve assembly. The flush valve (a.k.a. Douglas valve) is what the flapper sits on. It is located in the center of the tank and has the overflow pipe rising out of it. Stick you arm into the tank (don't worry, the water is clean) and push down on the flapper. If the water stops trickling into the bowl, you have found your problem.
Even though you replaced the flapper, it may not fit correctly, or there may be damage to the rim sealed by the flapper. Try feeling around the rim of the flush valve for divots, cracks or deposits. You can either replace the flush valve, or you can try a product called a "flush fixer".
If pushing down on the flapper doesn't help, you probably need to replace the flush valve or you may have a cracked tank.
The flush fixer is a hinged flapper/seat assembly that sits on top of the flush valve, exactly where the old flapper went. What makes this work is that on the bottom of the unit is a jelly-like substance that seals against the damaged seat of the flush valve. So, the jelly will fill in the areas and prevent leakage at the points where water got between the flapper and the damaged seat.
Replacing the flush valve is a chore, as it involves removing the tank from the bowl. So, you will need to turn off the water to the toilet, disconnect the supply line to the fill valve, and drain the water from the tank. Remove the tank from the bowl by unbolting it from underneath (you may have to hold a screwdriver on the bolt to keep it from turning as you remove the nut). Gently lift the tank and set it on its side.
Next, remove the spongy-looking spud gasket buy pulling it off, and then use either water pump pliers or a spud wrench to remove the lock nut (this holds the flush valve in place). If you pull the refill tube from the overflow pipe, the flush valve will lift out.
To install the new flush valve, push the tapered washer onto the end of the threads and seat it so that the tapered end faces the threaded end. Shove the new valve into the hole and screw on the new locknut one-quarter turn past hand tight. Push the new spud gasket on and you are ready to re-install the tank.
Before you do, however, check the bolts that hold the tank to the bowl. While you have the tank off, it's a good idea to replace these bolts. In most cases, removing the tank will disturb them enough to get them to leak. It's a simple matter of pushing a washer on the end and tightening it to the tank.
Pick up the tank and gently set it back onto the bowl so that all of the holes line up. Install a brass washer and a nut onto the end of each bolt and tighten them. Be very careful here-if you overtighten these bolts, it will crack the toilet. Once the tank is secured to the bowl, reconnect the refill tube to the top of the overflow pipe and then hook up the water supply back to the fill valve. This should give you years of leak-free operation.
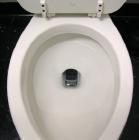
 Sometimes nothing seems to work when unclogging a toilet. You've plunged it over and over and still it doesn't seem to work. Even the toilet snake won't clear whatever is blocking it. I've pulled a lot of unusual things out of toilets...things that have no business being in toilets like pens, eyeglasses, toys, etc. Pens and eyeglasses typically fall out of a shirt pocket when a male bends over to lift the lid of the toilet. You would never see these items by looking down into the toilet bowl. Rather, they get caught in the trapway, which is beyond where you can see.
Small, thin items can cause a lot of frustration. They hide along the trap and occasionally will stop waste from flowing down the drain. Sometimes the only thing to do is remove the toilet from the floor and snake it from underneath the toilet, which is the reverse of how you would normally do it.
Once you drain and remove the toilet, gently set it on it's side. Push the snake up through the bottom of the toilet until it comes out of the bowl. Be careful at this point because you can scratch the bowl. Tie an old rag onto the end of the snake and pull the snake back through. The rag will fill the trapway and should bring out the blockage with it. As a last resort you can put on a rubber glove and see if you can grab the obstruction from the bottom of the toilet.