 Painting is quick and inexpensive and there probably isn’t a bigger bang for the buck in fixing up your house. From a curb appeal perspective, you don’t even need to paint the entire exterior. By simply dressing up the house with some accents you can really set your house apart from the rest of the neighborhood (assuming your HOA allows it).
Paint the trim and eves. Scraping and painting is no fun but the finished product looks fresh and gives the impression that the house was well taken care of. But why stop there? Paint any stucco popouts a different color. Paint the front door and trim (or stucco popout) the same color. Let’s say that the house is tan. Paint the trim work either a lighter or darker color. Maybe it will look great if it is the same color as the trim at the eves and fascia. Also, paint any stucco popouts around the windows the same color so that the colors flow when someone looks at the house.
Painting stucco popouts is easy with a sprayer. Tape and cover the windows. Where the popout meets the stucco, you can use masking paper at that intersection to protect the wall. So the only thing uncovered will be the popout. Use some light passes with the sprayer and then remove the masking paper and tape.
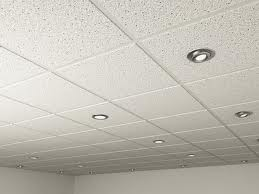 A handyman can replace ceiling tiles quite easily. The only challenging issue is finding a perfect match.
Ceiling tiles get stained from plumbing or roof leaks, and when they do it looks like a brown splotch on the tile. It’s not a very professional look for an office.
You may find a very limited supply at a home center, so plan on going to a specialty retailer. Look up “acoustical ceiling tiles” for some choices and you would be wise to bring in a sample tile.
The edges of the ceiling tile sit on a suspended track system. They weight of the tile keeps it in place. You can remove the old tile simply by pushing up on one side and lifting it up and out. You will have to angle it to get it out. The new tile just lifts into the opening and you can set it into the track.
There are some tricky parts when you have to cut a tile. You will have to cut them as you approach the end of the ceiling. You can score them and snap along the score line. Place the tile on a flat surface so that the score line is along the edge of the table and then gently push to snap. You can also just cut the tile completely through. This takes more time, but will leave you with a cleaner finish cut.
 There are times when you open a cabinet door and maybe it makes a cracking noise, or it may not want to stay closed and instead pops back open.
Start with the hinges. Inspect them and check that they are not damaged or loose. On base cabinets, kids will open the doors and sit on them which can either damage the hinge or surrounding wood. If this is the cause, you may have to replace the hinge or repair the damaged wood. Also check to make sure the hinges are not loose. If they are, obviously try to tighten the screws that hold them, or you may have to remove the screws, add some toothpicks and glue or a golf tee and glue. If you use a golf tee, drill a small pilot hole for the hinge screw to screw into.
If the cabinet door won't stay closed, you can use a magnetic catch to hold it closed. You won't be able to see it when the door is closed. You can screw the magnet side of the catch to the frame of the cabinet and the metal plate to the door frame. When the two halves come together, they stick until someone pulls the door away from the frame.
 Installing a plumbing compression ball valve shouldn’t be intimidating. You really only need a few wrenches and a little elbow grease.
Turn the water off before you start working on this. If you are replacing an existing compression ball valve, it is your choice to replace the nut and ferrule on the pipe. The valve will be threaded and will slide onto the bare copper pipe where it will contact the ferrule and nut. The nut screws onto the valve and compresses the ferrule in between to seal out any leaks. If it is a new installation, you slide the nut on first, then the ferrule, and finally the valve. However, I usually leave the old nut and ferrule on the pipe and reuse them. You can certainly remove them but it can be difficult and time-consuming. The nut will just slide off once you get the ferrule off, but that is the tough part. Since the ferrule is soft and has been compressed, it really grabs the pipe well. You can use a large wrench and grab it. Rotate it up-and-down while forcing it toward the end of the pipe. From there you can slide the old nut off and replace them with the new parts.
Use a wrench to hold the valve in an upright position while you use a 2nd wrench to tighten the nut. Turn the water back on, check for leaks, and tighten a little more if you see a drip.
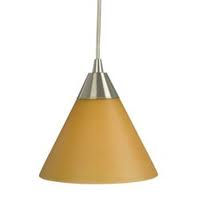 If you want to upgrade the look of your room, many people consider installing pendant lights. These are perfect over a work surface or bar, and if you already have recessed can lights there, it is really easy and fast. If you can replace a light bulb, you can install the conversion kit. They are widely available online, but there may be some local retailers that stock them.
They conversion kits work the same way, but will have varying mounting hardware. Basically, you unscrew the bulb in your recessed light and screw in the connection which powers the fixture. The screw-in mechanism looks just like the base of the light bulb and will run the electrical power to the pendant. The only thing you will need to do is to adjust the length of the cord and cover the opening with the decorative cover…and it’s the cover that gives the secret away.
Most pendant lights have a small escutcheon that covers the hole in the ceiling. The conversion kit must have a cover large enough to cover the opening to the light fixture. That doesn’t mean it looks bad, but rather the pendant fixture is larger so that it doesn’t look unbalanced. All in all, you can quickly and inexpensively change the appearance of the room with the kit.
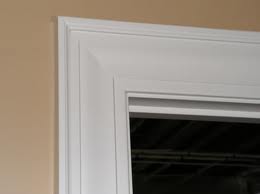 If you are replacing the door jamb or casing around the jamb, the very edge of the jamb should be exposed before the casing is secured to it. This is the “reveal”. The casing spans the gap between the door jamb and the wall and hides things like nails and shims so that all you see is the attractive wood work around the door.
I can’t say that there are any hard and fast rules on the sizes of reveals, but generally the size of the reveal is 3/16” of an inch. However, depending on the size and profile of your casing, the reveal can be larger, but I wouldn’t make it smaller. If you place the casing too close to the edge of the jamb, you can run into trouble with the hinges (this could happen if the profile is tall and the hinges are large in diameter). If you have a large door and have tall baseboard and casing, it would certainly be appropriate to extend the reveal. Play with the size until you are satisfied. The larger the material you are using, the larger you can make the reveal. By the way, it is much easier to paint the casing first and then install it. After that you can just fill the nail holes and touch up those spots. It’s easier than trying to cut around the entire perimeter.
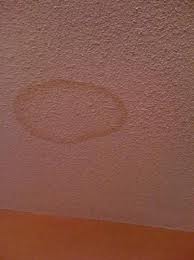 Water stains on drywall look ugly. On a ceiling, it can look like a big coffee stain, while near a floor it looks somewhat lighter in color as the water can go elsewhere. Note: there are times when you may want to have a professional check to see if the water damage has led to any mold or fungus issues, which can lead to health problems in certain individuals. So be careful.
If the texture on the surface is in good shape, that is dry and doesn’t flake off when you touch it, you can probably get away with sealing the stain and painting. Use a stain sealer like Kilz or Zinsser and apply it over the stain. You may have to apply a few coats to cover the stain. Once it is dry, give it some paint. You will likely have to paint the entire wall, rather than just the stained area. By the way, the stain sealer is somewhat thicker than paint, and so you may find that your textured area becomes less textured after you apply the stain sealer. It tends to knock down the ridges of the texture.
If the texture was flaking off and the wall is dry, you can retexture the area and then paint.
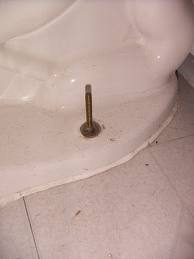 Removing a toilet from the floor for the first time can be intimidating. After all, its big and heavy and you certainly don’t want to touch the business end of it. Here’s a couple of tips.
It’s a good idea to wear rubber gloves. Don’t wear nice dishwashing gloves, just buy the cheapies at the home center. Turn off the water to the toilet and flush the tank, holding down the lever until the water drains out. You can disconnect the water supply line where it connects to the fill valve at the tank.
The last thing to do is to remove the nuts that hold the bowl to the floor, but before you do that, try to get rid of as much water in the bowl as possible. You can do this by plunging the bowl.
With the nuts removed from the floor bolts, you can lift the toilet. Use a large garbage bag (like a leaf bag) and open it up on the floor. This is where you will place the toilet. Rock the toilet from side-to-side to break the seal and then lift it from the floor. Be careful here…toilets are heavy and awkward, so you have to straddle the seat and just lift it enough to clear the floor. You can also remove the tank to make it lighter, but then the toilet becomes unbalanced. Any water that you didn’t get out of the bowl will be sloshing around with each step, so have the bag close. Set the toilet gently in the bag so that you don’t cut the bag and spill the water left in the bowl.
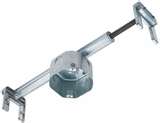 A ceiling fan typically weighs more than your average light fixture. So if you are replacing a light fixture with a ceiling fan, make sure the box in the ceiling is not only able to support the weight of a ceiling fan, but also that it is rock solid and doesn’t move. If the box has any flex in it, the fan will wobble.
A good way to avoid a wobbling ceiling fan is to install a brace bar. It makes for a solid foundation. You will need to remove the old box from the ceiling (turn off the power before doing this). It may either unscrew or you may have to run a saw blade between the outside of the box and the ceiling drywall. Be careful here not to damage any wiring.
The brace bar will have some sharp spikes at either end of it. These spikes dig into the ceiling joists to hold it in place. You place one end into the ceiling hole and then the other end and center the bar over the hole. Then turn the bar and it will push the legs outward toward the joists. When you meet resistance, give it an extra turn to seat the spikes.
With the bar centered over the hole in the ceiling, connect the box to the bar. There is a “U” shaped bolt that hangs over the bar for this. The box connects to the “U” bolt and hangs in place. Connect the electrical cable with a clamp and install the ceiling fan as normal.
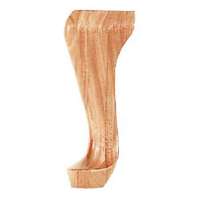 A handyman can usually fix a dent in a piece of wood furniture. A dent is caused by an impact that compresses the fibers of the wood. It can be reversed back to normal with the help of a little steam.
Just place a few layers of damp fabric over the dent and then touch the fabric (not the surrounding wood) quickly until you get the desired result. Be aware that this process can go wrong pretty fast, so you need only touch the fabric and lift it off quickly and gradually extend the contact time until the dented area is level with the surrounding surface. Then let the area dry.
This process works well on solid wood furniture, particularly unfinished furniture. If the piece uses veneer (a thin layer of wood that is glued to a cheaper surface), don’t apply the iron to it as it will soften the glue that holds it down.
Once the area is dry, lightly sand the area or it may absorb more stain and turn a slightly darker color than the surrounding area.
If the impact was strong enough to cut the wood fibers, the steam trick won’t work. In that case, you will need to fill the area with wood putty to make it level, and then stain it to match the surrounding area. If the finish is not cracked or broken, and only the wood is compressed, you can try alternating hot and cold at the area.
Typically, you’ll need somewhere between 100-120 degrees for the heat and some ice for the cold.
Lay dry fabric on the damaged area and apply the heat for 10-15 minutes and remove it. Then place some crushed ice in a baggie and set it on the wood for the same time. You can repeat this process several times and the compression will usually rise back up.
If this process fails, you may be faced with either scraping the finish off and using the steam trick, but then you will have to refinish the area.
You just might reconsider the whole deal if repairing the piece of furniture is beyond your comfort level. Just tell your guests that the dings and scratches give it character.