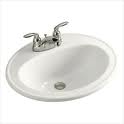
 How many times have you cursed your plumbing? Many times I would expect. One of those times might deal with the sink stopper. When you pull up on the sink stopper handle to engage the stopper and it doesn’t stop the water. Instead, the handle just drops back down and the stopper lifts back up so that the water just runs down the drain.
You are probably thinking that this is going to kill your weekend, but the reality is that it should take just a few seconds and likely the most difficult part will be getting access under the sink.
A sink stopper works like this: the sink stopper is connected to a pivot rod. This pivot rod has a ball on the end of it allowing it to move up and down. This up and down movement lifts and lowers the stopper. The other end of the pivot rod is connected to the handle. So when you lift the handle, the pivot rod pushes the stopper down closing off the drain. When you push the handle back down, the pivot rod lifts the stopper and allows the water to drain.
The problem is where the pivot rod ball attaches to the drain pipe. The pivot rod is held to this pipe by a cap nut. All you have to do is tighten this cap nut. If you over tighten it, the sink stopper won’t move freely, so tighten it to the point that the sink stopper will move but not so much that the stopper won’t stay in place.
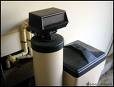 With all of the vacant properties out there, there is vandalism and theft on a daily basis, many of which are plumbing associated. Vandals will break into a vacant home and steal a variety of items. A popular item to take is the water softener. This is located in the garage and is a quick cut and throw it in the back of a truck. These units are four-to-five hundred dollars new, and the thieves can sell them for profit quickly.
Generally, they cut the copper piping behind the softener. In order to turn the water back on, this pipe (called the loop) needs to be reconnected so that water will flow into the house, and not all over the garage floor.
Depending on how the softener was removed, it may be a quick job or not. If the bare copper piping is sticking out of the wall, you can either sweat a new copper fitting or flex line onto each side, or even use a stainless steel hose with compression fittings on each end. If you are comfortable with a torch, here is an article on how to sweat copper piping.
For the compression fittings, you will place a nut over the pipe, slide the ferrule over the pipe, then place the mating hose onto the pipe and tighten it all up so that the ferrule compresses to seal out any leaks.
If you have remnants of copper flex lines still attached to the bare copper pipes exiting the wall, you will need to heat up the ends of the flex lines until the solder melts and remove them.
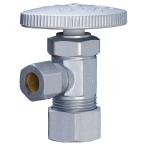 A leaking angle valve is a pretty common plumbing repair. These valves are located under a toilet or sink and rarely get touched, unless you need to service the fixture that they are supplying water to. When the time comes to turn them off, they tend to leak…and not stop.
In the event this happens to you, there are a couple of tricks you can try. First try to turn the packing nut slightly. This is a nut located right underneath the handle. Turn it clockwise and with any luck, the leak will stop. If it doesn’t, go to plan B.
Before you replace the valve, try turning off the water to the entire house. Remove the handle and packing nut and you will see the valve stem. Remove the valve stem and you will see the washers. Try to clean the stem and washers and get the washers pliable, as you might find some nasty deposits on them. Put everything back in place and turn the water back on. With any luck, you will have water flowing to the fixture and no water leaking from the angle valve.
If you still have a leak, you will need to replace the angle valve.
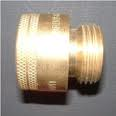 A hose bib vacuum breaker is also generally referred to as an anti-siphon. When you hear of an anti-siphon device or a vacuum breaker, you typically think of a device for your landscaping, and you would be correct, these are common plumbing terms. However, you should also have a device on each hose bib for protection against contamination.
So long as the water pressure remains high, clean healthy water is delivered to the neighborhood. However, if a problem developed and caused a drop in water pressure, such as a water main break, contaminated water could be drawn back into the home and mixed with it’s clean drinking water. This can cause sickness and can even be fatal depending upon the level and type of contamination and the person ingesting the water. Imagine for example if you were filling up a child’s swimming pool and the pressure dropped drawing that water back into the house’s potable water supply. Whatever contaminants that were in the pool could end up at your faucet. With a vacuum breaker, that water could not enter the water supply.
By installing a hose bib vacuum breaker, this contamination problem via the hose bib will be eliminated. These devices cost under $10.00 and simply screw onto the hose bib. Once they are screwed on, you can tighten the setscrew to firmly secure them in place.
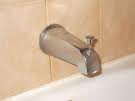 If you have a bathtub/shower combination, when you want the water to come out of the showerhead instead of the tub spout, you simply pull up on the tub spout diverter and the water shoots up to the shower head (for older styles there may be a separate handle in the wall for this).
The problem is that over time the gate inside the shower diverter will wear and either the gate of the entire shower diverter will need to be replaced. Replacing the shower diverter is easy, but you may be able to get a free gate from the manufacturer. By the way, the gate is the little door that blocks water from exiting the tub spout and forces it back up the riser to the showerhead.
Getting access to the gate is tricky. It is inside the end of the tub spout and you will either have to rotate the spout or practically stand on your head to work on it. You will need to disengage the bottom of the gate (it rides on the rod operated by the knob) and remove the gate. It is typically plastic and will slide off, but you may need to remove the knob too. Once you slide the new gate onto the rod, reinstall the end of the rod into the groove at the base of the tub spout. Then just turn the water on and test it.
 If you have landscaping at your house, you will likely have the opportunity to work with landscape plumbing issues, namely PVC piping and fittings. Working with PVC is easy as it cuts and glues quickly. But don’t forget the primer.
When connecting PVC, you want a nice square cut. Once you have the length measured out use a PVC cutting tool or a hacksaw to quickly cut the pipe. If you use a hacksaw, clean off the burrs left by the blade. Use primer to clean the exterior surface of the pipe and the interior surface of the fitting. Primer is colored (often purple) so that you can see if you have complete coverage on the mating surfaces, as well as a point of differentiation with the color of the PVC glue. Primer (and glue) are very flammable and dry quickly. Once you prime the piping, it will dry to a tacky feel.
Apply the glue using a dauber in the can. Go for complete coverage at the same areas where you previously primed. Use too much glue rather than too little. Push the pipe into the fitting with a gently twist and hold it still until it sets up (probably 30 seconds on a summer day). Once everything is assembled and dried you can slowly turn the water back on to test for leaks.
 Shower faucets and sink faucets that use separate handles for the hot and cold use a stem and a seat. The stem rotates as the handle is turned and a rubber washer on the bottom of the stem presses down against the seat to stop the flow of water. The flow of water is started when the stem lifts off of the seat to allow the flow of water. When a leak develops, it is usually the case that the washer at the bottom of the stem needs to be replaced, and the seat in the faucet body needs to be replaced.
After shutting off the water to the house, the stem can be removed and serviced by unscrewing it. The seat however can be a problem. You can remove it using a seat wrench but there are times when it seems the seat is welded in place.
Your other option is to resurface the seat. You can buy a resurfacing tool and place it into the valve body until it contacts the seat. By hand you can rotate the tool to smooth the surface of the seat. It will abrade the tiny pits on the surface so the stem washer and the seat will seal out any plumbing leaks.
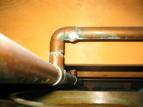 Invariably there will be plumbing problems. If you find yourself with a copper plumbing fitting that needs to be removed get ready to apply the heat. That is, the heat of a torch. For the most part, the only reason to un-sweat or un-solder a fitting is that you have a leak and it needs to be replaced, or maybe you are re-routing some plumbing lines.
You first will want to have a little wiggle room at the pipe-to-fitting connection. This connection will need enough room to be pulled apart once the joint is loosened, so plan on a few inches anyway. You may have to loosen pipe straps or hangars to get clearance. Also, since you will be working with a torch, have a bucket of water nearby in case you catch nearby lumber on fire. It's a good idea to use a flame cloth and cover any flammable material you will be working near (like wood studs or joists).
Drain the piping so that the pipes can get hot enough to melt the solder. If there is water in the piping, you will turn it into steam and it won't get hot enough to allow you to disassemble the parts. Once you are ready, light the torch and apply the tip of the cone to the fitting just inside of the edge. Keep the flame moving slightly around the perimeter of the fitting to uniformly heat it up. While you are doing this, use large channel locks to slowly pull apart the fitting and the pipe. You will find that heat travels quickly. I recommend using large channel locks or water pump pliers not because you will need a lot of leverage, but because the heat from the pipe well travel quickly and you will feel it in your hand. Once you have the pipe and fitting separated, let everything cool before you start working with them again. Here is some information on how to solder copper pipe.
 Connecting plumbing lines can be a slow process. If you are using copper piping you have to clean, flux, and use a torch to sweat on fittings. For CPVC you have to glue the fittings onto the piping, and for PEX you use crimp fittings that are squeezed around the plastic piping to mate each piece.
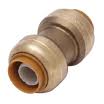
Sharkbite fittings are fast and make solid connections. They don't use glue or heat, but rather use o-rings, grip rings and a series of collars to line everything up. The grip ring is what holds the pipe to the fitting. It looks like a metal ring with angled teeth on it so that when the pipe is pushed into the fitting these teeth are angled in such a way that you can't pull the pipe out (without a special tool). This pins the pipe past the o-ring and into the tube stop for a tight seal. If you need to remove the pipe, you can buy a plastic release tool that pushes a sleeve into the grip ring which releases the teeth.
I generally use the shark bite fittings in certain situations. If I am concerned that a torch is too close to flammable material, or if space doesn't allow traditional joining methods, I'll reach for a sharbite. At nearly 3 times the cost of a copper fitting, they are expensive but worth it when the situation calls for them.
You can join a variety of piping using a sharkbite fitting including copper, CPVC, CTS, and PEX. Just pick the right diameter, cut the pipe squarely, push the pipe into the fitting with a slight twist, and it's done. A depth gauge, which is sold separately, tells you that the pipe has been pushed into the fitting correctly.