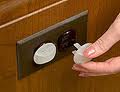
 Here is a simple handyman project that protects the little ones in your house. You must baby-proof your electrical outlets. It just seems that kids that are intrigued by outlets. Maybe it is because they are at the perfect height for a toddler that is crawling. Or maybe it is because toddlers have a never-ending curiosity. Whatever the reason, kids love seeing just how far they can go before they get caught. So preventing kids from sticking something into an electrical outlet is very important.
Fortunately, it is also very easy. Yes, you can buy the latest, greatest gadget to stop something from entering the outlet. They make special covers that you have to twist to be able to use the outlet. There are all kinds of things coming out that do this. But it seems if I have to stand on my head to operate a shock prevention device, I’m likely not going to use the outlet. So I go with simple.
I prefer the basic plastic plugs that you just push into each outlet. They are basic, they are cheap, and they are fast. You can buy them in the color of your outlet which may make junior not as interested in them. It seems that when you change the outlet, kids get curious about it and want to spend time figuring it out. Not so with plastic plugs. They are cheap, easy, and fast.
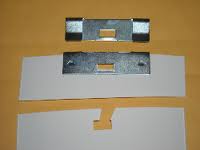 A typical handyman job is installing vertical blinds. It’s very easy and fast. I had a customer that asked us to replace a blind because a couple of vanes had broken. The vanes were a PVC material and the hole at the top had torn out making then unable to hang from the head rail. So the homeowner figured the entire blind needed to be replaced. There are other options.
If the vanes are common, you can buy replacement vanes that are sold in small quantities just for this purpose. If they match, it’s a quick and cheap job. If the vanes don’t match the existing ones, you could replace all of the vanes with new ones, so that the head rail is old but the vanes are new.
Easier yet is to buy repair clips that push onto the top of the damaged vanes. They basically recreate the hole. They are metal clips that simply push onto the top of the vane. Friction holds them in place. Simply line up the clip with the hole and push it down until it is seated. It’s that easy. Once you have the clip on the top of the vane, push it back into position onto the hanger coming out of the head rail.
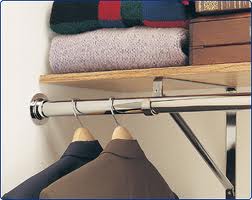 A closet rod falling down is a classic handyman job. The closet rod gets loaded up with far more weight than it is designed for and the homeowner wonders why it fell down. So the question of which is better, metal or wood, doesn’t have as much to do with the material as it does with how it is installed.
The key here is to distribute as much of the weight as possible over the length of the rod and wall it is attached to. I’m always amazed when I see a clothes rod secured on each end with no support in the middle. Do you think that would stop people from hanging too much weight on them? Nope. Wood rods will bow in the middle to the point of breaking.
At the very minimum, the rod should be braced on each end and in the middle. Depending on the length of the rod, it may be a good idea to add more bracing in between each end and the middle support for a total of five support points. That might sound extreme, but over a long wall it isn’t.
Wood rods use a shelf support and a hook for the rod. Metal rods are integral to the shelf and are supported with various wall anchors. When supporting these, you will get more support and stability when you install into the studs, regardless of whether the rod is made of wood or metal.
 As a handyman, I’ve not been asked to re-string a window blind. I was a little apprehensive, but it looked pretty straightforward.
The blind was an accordion style blind that as you raised or lowered it, the horizontal pleats would tuck it nicely together and out of the way. The blind was raised and lowered by a loop of cord. For whatever reason, the cord snapped and a replacement was found. Fortunately, for this style and size of blind, there is one common diameter of cord. I ordered it online and prepared to install it.
After removing the blind from the window, I popped off a cap on the string-side of the blind. There is a wheel on the end with teeth that the cord wraps around. I removed the broken cord simply by pulling it, which slightly lowered the blind.
I took the new loop of cord and wrapped it around one of the teeth. While holding one end of the cord still, I rotated the wheel so that the cord was fed onto it. When the tooth made its way back to the starting point, the cord was ready to go. I replaced the end cap and re-hung the blind. It worked like a charm.
 As a handyman, I get asked about everything under the sun. I had a customer that had a new granite countertop installed and it was really beautiful. It had an undermount sink with holes cut in the counter for the faucet. It looked very custom. A few weeks after it was installed, it the customer noticed some staining around the soap dispenser so she called the company that installed the granite. Apparently, the installer and salesman neglected to inform her that the granite would need to be sealed. The stains were a result of water dripping on the counter and permeating the stone. Granite is porous and the water was sitting on it and being absorbed into the stone which gave that area a darker appearance.
Sealing the granite is surprisingly easy. The important thing is to select a good stone cleaner and then a good sealer. You can go to specialty stores, or a home center sells them too.
Cleaning the counter is the first step. Get rid of all crumbs and debris and then apply the cleaner. The products are typically spray-on and wipe off.
Follow the directions from the manufacturer for both cleaning and sealing products. Clean the surface, wait for drying time, and then seal it.
Sealing it is as easy as spraying on the product, waiting, and then wiping it off. The manufacturer generally suggests several applications of the sealer initially, and then every six or twelve months thereafter.
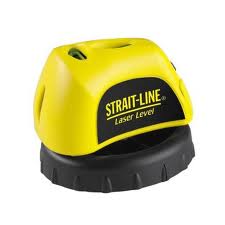 A handyman loves laser levels. I had a customer that was hanging a series of wall sconces in her house and wanted them to all hang at exactly the same height. Underneath the sconces was a chair rail around the perimeter of the room.
Laser levels generally are inexpensive and come in a few different styles. Some laser levels just stick to the wall and cast a line down it, while others sit on a stand and rotate a line around the entire room. The more expensive models are self-leveling and others require the operator to adjust them. The great thing though, is that they are extremely accurate, even for long distances. A good laser level will project a line or dot several hundred feet away and be accurate to within a fraction of an inch.
For this project, I would use a self-leveling rotary laser level. You can set it in the middle of the room, turn it on, and the laser will start spinning 360 degrees around the room. That way, you won’t have to make a mark with a traditional level and move it all about the room. You can certainly use the old-fashioned level, but as you move it around the room, your level line will likely be off with all the moving you have to do. You could certainly measure the distances from the ceiling or the floor, but either of those could be uneven and would leave you with tiny differences. A laser level will establish a level line regardless of floor or ceiling imperfections.
I would start the project by installing the chair rail. Decide at what height you want to install the rail and line up your laser level with this height. You can adjust the rotary level by raising or lowering the stand. Turn the unit on and it will start spinning like a disco ball in a ‘70s dance contest. You can let it run while you nail in the chair rail or make various marks around the room at the height of the laser line.
For the wall-mounted unit, simply move it up or down to align with whatever height you have chosen. This unit will cast a solid line down the length of the wall, and on some units it will display along the adjoining wall as well.
After the chair rail is in, cast another level line wherever you want the base of the sconces to sit. This way, you know that the distance from the bottom of the sconces to the top of the chair rail is exactly the same around the perimeter of the room.
 A customer asked her handyman about pool chemicals. Knowing the amount of gallons in a swimming pool is important for keeping the pool's chemicals balanced. For example when shocking the pool (hyper-chlorinating), knowing the number of gallons will tell you how much shock to buy.
Roughly speaking, you can multiply the length x width x depth x 7.5 gallons. This is for a rectangular pool. However, most pools are not a perfect rectangle nor are they a consistent depth. For the depth, you can take the depth in the shallow end, add that figure to the depth in the deep end, and divide that number by 2. This is an average and can vary significantly depending on where the pool's depth actually changes in relation to the length of the pool. Fortunately, you don't have to estimate to the nearest gallon. In fact, for shock, you can estimate to the nearest 10,000 gallons since a bag of shock covers that amount.
Here are some popular pool sizes and their gallons based upon an average depth of 5 feet:
16'x32' - 19,200 Gallons
16'x34' - 20,400 Gallons
16'x36' - 21,600 Gallons
18'x36' - 24,300 Gallons
20'x40' - 30,000 Gallons
24'x44' - 39,600 Gallons
If you are draining and refilling your pool, probably the most accurate way is to simply compare the previous month's water bill to the bill during the month when you refilled the pool. The increase in the gallons of water you used will tell you a close approximation of the gallons in your pool, assuming you were consistent in your water usage for other areas at your house.
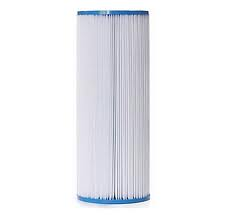 Yes, sometimes a handyman gets asked to look at pools too. This time the pool pressure was much higher than normal and the pool motor seemed to be straining. This warranted checking the pool filter cartridges. When I pulled the cover off of the tank, the filters didn’t seem very dirty nor did they appear to be clogged. They did appear to be “glittery”.
As soon as I lifted the filter cartridges out, I could tell a difference. Not only were they heavier than normal, but the pleats felt like sandpaper. These cartridges had calcium built up on them and were preventing a good flow of water.
I bought some cartridge cleaner and placed the cartridges in a clean plastic garbage can. I filled the can up to the top of the cartridges and added the cleaner…and waited. The next morning I removed the cartridges and hosed them off. They were smooth again and normal in weight.
After I reinstalled them, the pressure came back down to normal. Had the cartridge cleaner not worked, I probably would have had to replace the cartridges. By the way, I also drained the pool as the calcium had settled on the plaster as well.
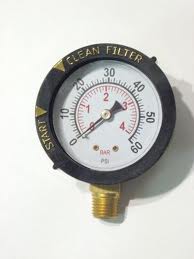 A handyman doesn't normally work on swimming pools often, but for a leaking pressure gauge, a beginner could certainly do it.
The pool filter pressure gauge sits on top of the filter and not only tells the pressure at the filter tank, but also bleeds out air. Air will rise to the top of the tank which is where the gauge is located. The gauge sits on top of a valve that allows air out.
If the valve leaks while the pump is on, or if you can hear a sucking noise right after you turn the pump off, then the valve is leaking and should be replaced. Fortunately, this is an easy fix.
The valve simply unscrews from the top of the tank. The valve and gauge will usually come in two pieces. Open the valve to allow air into the system and then unscrew the old unit from the top of the tank. The new valve will have an o-ring installed and you can just screw it right on to the top of the tank.
Wrap the threads on the bottom of the pressure gauge with teflon tape and screw it onto the top of the valve. Orient the face of the gauge so it is convenient to see and then turn on the pump. Bleed out the air using the valve an then close the valve when water starts to flow from it.
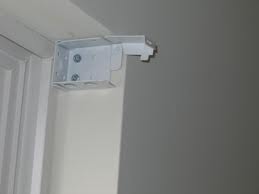 Here is a quick handyman tip that may save you some time and aggravation when installing window blinds. Whether the blinds are vertical, faux wood, mini-blinds, or some other combination, they will all install similarly. You will need to install some brackets on either end of the window, and then install some supports in between the brackets on the top of the window.
Do yourself a favor, and don’t use the screws that come with the window blind. The screws that come with the blinds are small and have small threads with little bite. I prefer to use course thread drywall screws. The nice thing about drywall screws is that you can place them in a drill driver, place the tip of the screw through the bracket and at the drywall surface, and squeeze the trigger. The screw will effortlessly go into the wall and hold the bracket in place. The screws that come with the window blinds are too small for this and are not sharp enough to push into the surface. I would use either 1” or 1 ¼” screws with course threads. These will be long enough to reach the lumber behind the drywall and provide a movement-free installation.