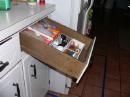
 Have you ever gone to open a kitchen cabinet drawer and the front about falls off in your hand? Well, builder-grade cabinets are built builder-grade. If you have a drawer that has a lot of weight in it, like a silverware drawer, a couple of quick pulls will do just the trick to damage it.
Children are the great destroyers of drawers. If they go to open a heavy drawer quickly, the weight of the contents slams into the drawer front. Repetition of this will cause the particle board box to start coming apart. Small children also like to open a drawer and pull themselves up on it to peek inside. It doesn't take much for the drawer guides to come loose from the sides.
Fixing these drawers is not terribly difficult. I would get some "L" brackets and, after tapping everything back in place, secure them to the corners of the box. I would secure the corners of the box with the brackets, but leave the bottom of the drawer alone as this is held in place by a groove on the inside perimeter of the drawer.
If the drawer front (the attractive wood piece) pulls off of the front of the drawer, you can screw that back together from the inside of the box. You must pre-drill the holes (not too deep as you don't want to go through the drawer front), and screw the drawer box to the drawer front.
To stop this from happening again, you might consider some child-proof locks.
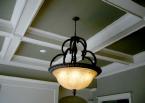 Those ceilings are very detailed and difficult to install. Although it looks like the coffers are made from solid beams, they are actually pieced together using lightweight stock.
First, plan how you want the ceiling to look. Consider how large and how deep the coffers will be and whether you will be painting or staining them. Also, make sure your ceilings are high enough and expansive enough so that the room doesn't look to cramped. Something else to cinsider is how your lighting or air-conditioning vents will look if they run through the ceiling.
The supports for the coffers will be channels that are glued and screwed to the ceiling. These will lok like an upside-down "U" and be made from lightweight stock; don't use the heavier MDF or plywood.
To build the U-shaped channel, cut the stock to the length and width of your choosing. Lay one piece flat on a worktable and then apply a bead of carpenter's glue alon gthe two long edges. Stand the two side pieces of the channel up, press them against the glue-covered ends of the piece laying flat, then use a finish nailing gun to nail along the edges to hold it together.
You are going to build these channels in three shapes: a cross, a "T" shape, and a straight section. The T-shaped channel will be attached to the perimter of the ceiling where one beam ends at another. The crosses will be installed where two beams intersect, and the straight sections will be used for support and alignment if you are using large coffers. You will decide the dimensions of these pieces based on your plan.
Lay out lines and mark them on your ceiling, so it looks more or less like a checkerboard. You should make parallel lines that match the width of the channels, so you will know exactly where to put them. You can use a chalk line for this, or if you have a projector, you can follow the lines it displays.
Apply thick beads of heavy-duty construction adhesive to the back portion of the channel and place it against the ceiling along your chalk lines. The open side should face down.
Screw the channel to the ceiling joists so that the screw sinks into the joist at least three-quarters of an inch. If you run into an area that doesn't have a joist, use 8d finish nails and shoot them in at an angle. You may not hit a joist on every leg of the channel, but once the entire ceiling is attached together, it will be very strong.
Now your ceiling will look like an afterthought, but this is where it all comes together. To close in the bottom of the channels, glue and nail long lengths of boards (the same lightweight stock or you can use a symmetrical baseboard of chair rail) to the underside of the openings. Make any cuts to the boards where they intersect with another board at a point that is not in the middle of the run. These intersections can later be covered with decorative caps.
To close in the coffers, build boxes out of baseboard to fit inside the squares that the channels have created. Miter the corners and glue them together. You can also drive a couple of brads into the corners to help the box stay tightly together. This baseboard box will attach to the bottom edge of the channel using 4d finish nails.
There will likely be a gap between the ceiling and the baseboard box, but that doesn't matter because you will build a second box from crown molding to transition from the vertical side of the coffer to the ceiling. The molding will cover any gaps.
You can choose any style or type. Since baseboard has the profile on top, you will turn it upside down so that the profile is visible from below. The nice thing here is that you can build both boxes on the worktable, transfer them to the ceiling and then nail them in with the finish nail gun.
When you are finished installing the coffers, you can putty over the nail heads and then paint or stain them.
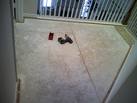 If you live in a 2-story house, you probably have a squeaking floor somewhere. This isn't fun to contend with, especially if your spouse is now asleep and you want him/her to stay that way. You need to either fix the squeak or develop skills like a gazelle to bound over it.
Typically, the squeaking noise can be traced to the sub flooring riding up and down on the shank of a nail. As you put your weight on the floor, the wood sub-floor travels down and squeaks. As you lift your foot and remove your weight from the area, the floor rides back up on the nail and squeaks some more.
You have a couple of options here. If you are going to replace the carpeting anyway, you can pull up the carpet from the area and screw a couple of deck screws into the sub floor. This will pin it to the joists and eliminate the movement. This is the safest way.
If you aren't planning on replacing the carpeting, you can either hire someone to stretch and re-secure the carpet back down after you fix the noise. Or, if you like some risk, you can get a nail gun and shoot a couple long nails at opposing angles through the sub floor and into the joist. You better hope there isn't a water line lurking close by though.
If you have vinyl flooring, you will likely have to get access via the ceiling of the first floor as you can‘t peel back the vinyl and reinstall it. You will probably need to cut a hole in the ceiling below and shim and glue to fill the gap and stop the movement. Then you have to repair the ceiling.
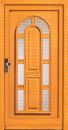 Carpentry jobs are always fun. Have you ever had a door that closes by itself, and it isn't supposed to? Or maybe a door that doesn't latch correctly? These are actually pretty simple to fix.
Let's take the first problem. This door closes by itself because it is not plumb.
You could spend hours trying to get it plumb, putting shims behind hinges and chiseling wood here and there. Or you could decide to do the quick fix: bend the door's hinge pin. Now, you're not going to bend it by much, mind you, just enough to cause a little friction in the hinge. Pop the bottom hinge pin out by tapping it with a stubby screwdriver and a hammer. Set the hinge pin on a hard surface (not the kitchen table) like the sidewalk. Tap it gently with a hammer in the center of the pin so that it puts a slight crook in the pin.
Reinstall the pin by tapping it into the hinge with a hammer. If your door is large and heavy, you may need to repeat this with the next hinge pin to gain some uniform friction. Problem solved.
The other door that doesn't latch correctly is easy to fix, too, but not as easy as smacking a hinge pin with a hammer. This problem stems from the strike plate and the door latch not being aligned. The strike plate is the flat piece of metal on the doorjamb with the hole in it that accepts the door latch (the part that sticks out of the side of the door).
The door latch may be too high or low to enter the hole in the strike plate. The strike plate may be so far in that you practically have to throw your shoulder into the door to get it to latch. Assuming the problem isn't due to a warped door, you really have only two options: move the strike plate or the door latch.
If the alignment problem is due to a height difference between the strike plate and latch, try to move the latch first. Cut out a piece of cardboard and shim it behind one of the door hinges. If the latch is too high, place the shim between the doorjamb and the top hinge. If the latch is too low, shim between the doorjamb and the bottom hinge.
The other option is to unscrew the two screws that hold the strike plate and raise or lower it to meet the latch. The only downfall with this is that you will need to chisel out the wood in the strike jamb so that the plate sits flush with the jamb. This isn't hard, but it will leave a noticeable mortise. This, however, can be filled in with wood putty and painted.
Align the strike plate with the latch and make trace marks with a pencil on the jamb. Chisel out the wood to the depth of the plate. Use short, light taps instead of one big one as you will tear out more wood than you expect.
Fill in the old screw holes since you will likely be moving the strike plate a small amount (the screws will tend to wander into the old holes and make alignment nearly impossible). Slather wood golf tees with wood glue, stuff them into the holes and saw them off flush with the surrounding wood.
Hold the strike plate back up to the jamb and mark the location of the holes. Predrill small pilot holes and then screw the strike plate to the jamb. Your door should close and latch effortlessly.