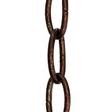
 If you are installing a hanging light fixture, you may have the need to have your handyman lengthen the fixture’s chain. This isn’t difficult to do provided there is enough wire to do it.
The goal here is to avoid splicing the electrical wiring or re-wiring the fixture to do this. If you are looking to lengthen the chain be a few inches, you should be fine. There is more wire coming out of the ceiling cover than you need, and you should be able to move this our of that area and into the chain area.
You will likely have to buy some matching links for the chain and then disconnect the last chain where it meets the ceiling cover. You can then feed the extra wire down into the chain link area. To span the gap, you need to add a few new links of chain. The links will have a separation in one side, but don’t pull them away from each other. Instead, twist the link horizontally so that the gap will open and you will be able to add a few links in this manner. By twisting the link, you avoid distorting the oval shape of the link.
When you have added enough links to bridge the gap, simply twist the links back into their original position. Make sure the ends of the links are aligned and you will be ready to hang the fixture.
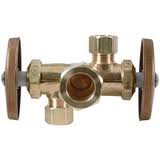 Sometimes a handyman has to be innovative. When working under a kitchen sink, there are specialty plumbing angle valves you can use rather than using a saddle valve. If you are installing an icemaker line to the refrigerator, or adding a reverse-osmosis water system, you need to supply water to these items. Many people will use a saddle valve, which pierces an existing water line. These valves are prone to leaking and I really dislike them because of that. However, you can buy specialty valves that will allow you to supply water to various areas and be able to stop the flow of water with a handle.
If you have a standard cold water angle valve with one outlet under the sink, you can replace this with a three-way valve or even a dual-handle three way angle valve. These are unique and will give you the ability to stop water to one fixture while keeping it on at others.
A three way angle valve has one handle and two outlets. The handle can stop and start the flow of water at both outlets simultaneously. To get even more control over the flow of water, you can replace the valve with a dual handle-three way angle valve. With this type of valve, you can not only supply water to two separate fixtures, but you can start and stop the flow of water independently of the other. It has two outlets and two handles to control the flow of water.
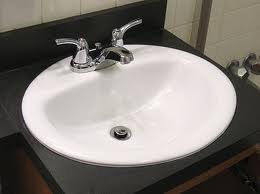 You probably don't need a handyman to remove you bathroom sink for you. If you are planning on replacing your bathroom sink, you can probably remove the old one from the vanity yourself. Depending upon the type of sink you have, this may be easy or challenging.
Once you have disconnected the drain and water supply lines, you can begin to remove the sink.
If you have a drop-in sink (one whose weight rests on its rim) the removal should be straightforward. These sinks are usually held in place by some clips underneath the countertop in the cabinet. Peek underneath the countertop and look for the clips. They can be removed by unscrewing them. This will allow you to lift the sink from the hole. Sinks are usually caulked in place as well, so before you try to lift it, use a utility knife and cut through the caulking. In addition to all of this, the sink may have adhesive underneath the lip where it rests on the countertop. If you are planning on keeping the countertop, be very gentle trying to goose up the sink from its hole. In many instances, I’ve seen the sink pull up ceramic tiles trying to remove it.
The same procedure goes for undermount sinks. Some have a combination of epoxy, adhesive, and clips to hold them to the underside of the countertop.
 A handyman in Las Vegas works in pretty extreme heat. If you are planting your landscape, your plants can struggle with just one missed day of watering. When you are laying out your landscape irrigation, it’s a good idea to install 2 drip emitters per plant rather than just one. The reason is simple, emitters get clogged and not deliver water to the plant. In the summer heat the plant will die.
From the main drip line, which is usually either ½” or ¾”, you will run a microtube from it to the individual plants. Instead of installing a drip emitter on the end of this line, install a “T” fitting and run 2 separate drip lines, each with its own drip emitter, to the plant. If you would normally install a 2 gallon per hour emitter on one line, instead install a separate 1 gallon per hour emitter on each line. In this way, the plant’s watering needs will still be met, although from 2 separate emitters instead of one.
The benefit here is that if one of the drip emitters gets clogged, the plant will still receive some water to survive. When you notice the plant struggling, you determine which one of the emitters needs to be cleaned out so that the plant gets the necessary water.
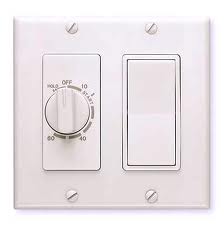 If you are tired of people leaving the lights on in a room, you can call your handyman for some help. You can replace your standard wall switch with a timer switch or a motion switch. These are easy to install and should only take a few minutes to do.
A timer switch will activate the light when someone turns the timer on. This style switch works just like an egg timer. Turn it on and the light comes on. It will count down from wherever you turned it, from an hour to a few minutes. When it reaches zero, the light turns off.
A motion switch works similarly except that the switch must sense motion for it to turn on. I like these switches for energy savings, but occasionally the light will turn off prematurely. In that event you have to wave your hand in front of the switch or move in front of it for the light to turn back on.
Wiring them is the same. Turn the power off and connect the wires in the same manner they were connected to the old wall switch. Typically, the black wires get connected to the terminals (although some switches have small wires that you will need to connect with wire nuts), and connect the ground. Turn the power back on and test the switch.
 Many of the handyman jobs we do require touch up paint of some kind. The act of painting is easy. Getting a good match on the paint however, can be tough. Even if the original paint is at the property, applying it to the wall may not match. Some painted walls get sunlight exposure and some do not. If the home has smokers in it, that can certainly make it so the paint won’t match. So don’t be surprised when you take paint out of the can and it doesn’t exactly match.
You can certainly take a sample from the wall and have it computer matched at a paint store. It may not exactly match but should be awfully close. In an inconspicuous area, you can barely cut through the painted drywall paper and peel up a piece at least the size of a quarter. When you get the paint matched, fill in the void with joint compound, texture and paint it.
Probably the best way to do touch up painting is to paint the entire surface from wall to wall. Dabbing paint over problem areas is always noticeable, but if you paint the entire surface, the problem will go away. Most people won’t notice a slight color variation at the corner or edge of a wall.
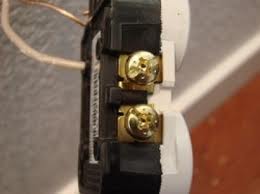 A repeat customer called this handyman to ask for help in troubleshooting his half hot outlet. These are outlets that have power in the bottom plug all the time, while the top half of the plug receives power only when a wall switch is turned on. These are perfect for controlling a table lamp or floor lamp.
Both of the plugs on this particular outlet had power to it all the time. The homeowner was upgrading all of his outlets and switches to a more modern style for the appearance. He swore that her replaced each wire exactly where it had been on the old outlet. And he had.
He forgot a simple step when wiring a half hot outlet. He forgot to break out the tab that connects the top hot side to the bottom hot side. Without doing this, both halves receive power all the time. When you remove the tab, the top will only receive power when the switch is turned on. You can use needle nose pliers, or regular pliers for this. Grab the tab and give it a few back-and-forth moves and it will break free. You will want to turn the power off before you touch the outlet though. After you break out the tab, screw the outlet to the junction box, install the cover plate, and turn the power back on. The light should illuminate only when switched on.
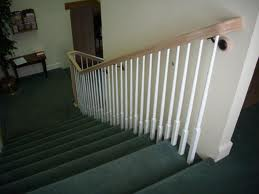 This is a fairly simple handyman job if you have the right tools. When a stair spindle comes loose, you hope it isn’t broken and that it can slip back into place.
Whether or not the spindle is on a level surface or an incline (like going up the stairs), the repair is pretty much the same. The hope is that the spindle can be reused. If not, you may have to find another one or have one turned on a lathe. In most cases, the spindle is held in place by inserting the top into a hole in the underside of the wood hand rail and then pinned in place at the bottom.
You can clean up the end of the spindle with a light sanding, and remove any glue from the hole in the hand rail with soldering brush and some sandpaper. Don’t ream it out so much though, that it becomes sloppy when inserting the spindle.
You can spread a light coat of glue on the end of the spindle and insert it into the underside of the hand rail. Swing the bottom into place against the surface and use a pneumatic nailer and squeeze off a nail or brad to hold it in place. Install another nail or brad in the opposite side to hold it in place. You may consider filling the divot with wood filler and painting it, but the nail holes will be small enough where you probably won’t notice.
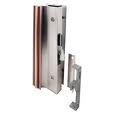 As a Handyman, sliding glass door handles are a chief complaint that we get. Maybe they are loose, or maybe its that they just don’t lock the door. You can give your door a little TLC just by paying attention to the handle.
Sometimes the door becomes more difficult to slide, which requires you to push harder on the handle itself. It’s not the handles fault, it’s just the nearest point of contact for you to close the door.
It’s a good idea to make sure the door locks into the jamb. There are several different mechanisms for this, but generally you will have a lever that you flip on the door handle and it secures a latch from the handle into the jamb. The catch on the jamb is adjustable to that the handle latch can mate up with it to lock the door. Simply loosen the screws that hold the catch to the jamb and adjust it until the door locks.
With all of the pushing and pulling, you may need to tighten the handle. There are usually two screws that hold the handle to the door. Tighten these down so that the handle doesn’t move.
Finally, you may want to clean the track and lubricate the rollers so that the door slides easily.
 I found a piece of furniture that was going to be thrown away due to a series of scratches on the top. I figured this was a perfect opportunity to test out some handyman skills. It happened to be a table and the scratches were more like gouges. In fact, gouges is probably putting it mildly. This was a table with a gloss finish that had been mangled during a move. It had both deep and wide gouges.
Never having repaired furniture finishes before, I didn't hold out a lot of hope, but felt with the right process, it just might turn into a keeper.
I was pleasantly surprised by the finished product. I used three products for the repair. The first was a stainable wood filler. This filled the gouge to be flush with the rest of the surface. I applied this with a putty knife and cleaned the overfill off with a damp rag.
Once this dried, I stained the putty with a wood stain marker pen by Homax. I chose the closest color and applied thin coats to the putty. It seemed to take a while for the final color to appear. The initial color was light but darkened slightly as time passed. The final color was awfully close.
The finishing touch was matching the sheen of the table top. For this I used a scratch repair pen by Varathane. This applied a glossy finish on the repair that further helped it to blend in. It was too glossy initially, but after using a soft cloth, I was able to blend it in fairly well.
After I was satisfied with the finished product, I started to touch up smaller scratches. I didn't have to fill any of these and instead went right to the stain and gloss. This system worked beautifully to cover those.