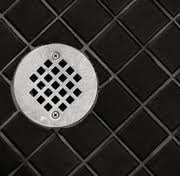
 I went over to a customer’s house to investigate a noise that the homeowner said was new. The gurgling noise was coming from a small bathroom downstairs that, when any other drain ran in the house, made a loud gurgling sound. The noise occurred when the toilet next to it was flushed or when any upstairs fixture was running. Since the noise was coming from the shower drain, that was an obvious place to start. The cause was also very obvious. The shower was rarely used and the trap had run dry.
It is common that when the trap has run dry, a sewer smell will enter the room but this isn’t always the case. The sound though was very loud. I simply took a small bucket of water and poured it down the drain. The sound stopped since the water in the trap now acted as a buffer.
In speaking to the homeowner, that particular shower never gets used, which is why the water in the trap evaporated, creating a void where sewer gas and noise can enter the room. I’m sure I would have been called earlier had sewer gas smells entered the room, but apparently the noise got to be enough. The homeowner now knows to pour a little water down the drain if he hears noises or smells sewer gas.
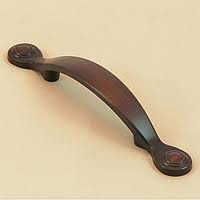 Dressing up your cabinets with new knob or drawer pulls is a great idea. You can totally change the look of your cabinets with just a few hours and a low cost.
Cabinet knobs come with screws that enter through the back of the drawer face and screw into the cabinet knob or pull. If the screw is too long, there will be a gap between the screw head and the back of the drawer or door face. This will allow the knob to pull out by that amount of distance before the screw head engages the drawer or door and pulls it open.
Two obvious choices here: either cut off the screw or fill in the gap with a washer or two.
The danger with cutting off the screw is that it will be very difficult to get it to thread into the knob. I have used the washer trick many times and it is fast and easy. You don’t need to get the distance perfect, just so that the screw enters the knob and the whole assembly gets tight so that it won’t come apart. You are probably looking at between 1 and 3 washers per knob to do the job. Add some washers to the screw and insert the screw into the rear of the drawer face, then screw on the knob. If it is still loose, just add another washer.
 Do you have a toilet that will start running and then suddenly stop for no reason? You need to replace the fill valve and/or the flapper. I’ll bet it’s the latter.
Your toilet is running because either water is running in the toilet or water is running out. Take the cover off of the tank and look at the overflow tube (typically a white tube about the diameter of a quarter). If water is running down this tube, your toilet is overfilling. The cause is either the fill valve or the float connected to the valve.
If the overflow tube looks OK, the cause is either the flapper or the lift chain. I would change both of these parts because when one goes, the other isn’t far behind. Changing these items is easy and inexpensive.
Many things can go wrong inside a toilet (besides the obvious), but changing these two parts will fix 90 percent of toilet problems.
First, turn off the water supply valve under the toilet. Next, flush the toilet; this will empty the tank. Unscrew the coupling that connects the water supply tube to the bottom of the toilet, and slowly pull out the tube. Now, unscrew the nut that holds the fill valve on and remove the valve. Have some rags and a small bucket ready to catch any excess water that didn’t drain from the tank (this water is clean).
Slip the rubber washers onto the new fill valve according to the manufacturer’s instructions, and insert the valve into the hole in the bottom of the tank. Screw the nut onto the valve to secure it in place and re-attach the water supply line. Hand-tighten only. Adjust the height of the valve, again per the manufacturer’s instructions, and connect the fill tube to the overflow tube.
To replace the flapper, disconnect the pull chain from the flapper, then pinch the tabs on the back of the flapper. It will lift right out. Install the new flapper by inserting the rear tabs into the retainer and connecting the pull chain.
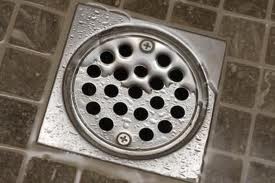 The answer to the question of whether or not a clogged shower drain can cause a leak is that I guess it depends. Generally speaking a clogged drain won’t cause a leak. However, I can imagine times when there are secondary causes that are associated with the backup of water.
Regarding a shower drain, as the water backs up back into the shower pan and begins to rise, if it gets high enough, it may creep into back into the wall if there are voids in the caulking or grout.
The backup of water will likely put extra stress on the joints as well. Not that the joints won’t hold up, but they are not normally under pressure. It’s similar to when you plunge a drain…occasionally a joint might be disturbed to the point that it leaks, but it isn’t common enough to worry about.
Toilets and sinks are the same way. If a toilet backs up, it can certainly overflow on to the floor and cause problems downstairs. For a bath sink, there is an overflow drain that should take the water to the drain, but if the drain is plugged it can overflow. I’ve also seen the overflow channel below the sink leak as many of them are plastic and are not secured very well. So generally I would say a clog won’t cause a leak.
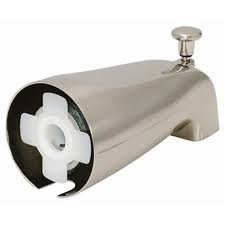 When someone says they just installed a new shower diverter, but now they have a leak downstairs, that is a pretty good indication that the diverter installation didn’t go so well.
If you were to remove the tub spout diverter you would likely see just a bare pipe (although some are screwed onto threads). With the bare pipe type installation in particular, there is an o-ring that seals out water from exiting the rear of the tub spout diverter. Want to guess where the water goes when it exits? It goes into the wall. So I’m guessing that the cause of the leak has to do with the connection where the spout meets the pipe.
For the bare pipe connection, it may be that the o-ring has twisted or is torn. There is a lot of pressure on that part, and it is smart to remove it and inspect it. Use an allen wrench and loosen the set screw underneath the spout. Then you can pull it off. If the rubber is damaged, replace it. When you reinstall the tub spout, you can try some liquid soap on the o-ring to help it slide along the pipe without twisting. When you have the spout in the right location, tighten the set screw.
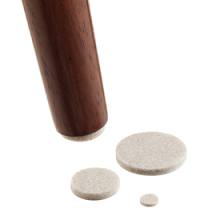 A quick handyman fix for avoiding scratches on your wood floor by furniture is only minutes away. Wood floors are beautiful until they get scratched up. I see this often in home offices where a desk is the culprit. Some people will push away from the desk and instead of the rolling chair moving, the desk does…and it leaves marks on the floor in the process.
You can buy little feet for your furniture that will prevent scratches. For desks, there are small feet that have a soft felt-like substance on the bottom, and a pin on the tip (although some are just peel & stick). The pins get tapped into the bottom legs. You may have to turn the desk on it’s side to install the feet, or you may be able to lift the leg and set it down upon the sharp pin. If the wood is soft, the weight of the desk may allow the pin to penetrate fully into the leg.
For larger pieces of furniture, like couches, you can buy feet that have a non-scratching surface on the bottom. These are wider feet that are basically flat with a small rim around the top to keep the leg of the furniture from sliding off. For these you just lift the leg of the furniture and set it on top of the foot.
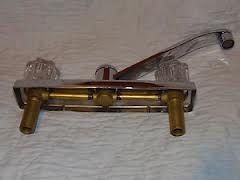 Replacing a faucet starts with removing the old faucet. Occasionally, this can be a real chore.
Typically you are laying on your back trying to feel your way up to the underside of the faucet to get a wrench on the nuts. The nuts hold the faucet to the sink, and so these must be removed before you can install the new one. Turn the water off first, and then remove the water supply lines that lead to the faucet. You will get a little water that dribbles out.
If you can’t get to the nuts with a standard wrench, try using a basin wrench, with has jaws and an extension that allow you to get to tight places. This may be enough to get the nuts to loosen. There are times though that it seems nothing will work. For these times, you may need to break out a saw.
A hacksaw blade will cut through the nuts, but it will take time. Chuck a blade into a close-tolerance handle and start cutting (you may also try a nut-splitter tool, but much of this depends on how much space you have there). The close quarters really is the issue. If it was a wide open space, you could use any tool you had and be able to place leverage on it to remove it. I remember having to use a reciprocating saw on one faucet. I had to cut it into a few pieces before I could get it out. You may need to get creative.
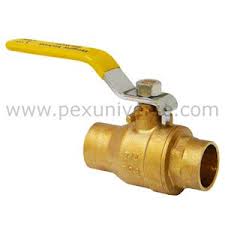 A ball valve is superior to a gate valve and only costs a few dollars more. So, whenever you have the opportunity to install a valve, it’s a good idea to use a ball rather than a gate. They install in the same way, so really it is silly not to spend a few more dollars and get a superior part.
If you already have a gate valve installed and have to replace it, you can certainly replace it with a ball valve. You will need a torch to heat up the parts and remove them.
Turn the water off and drain it from the pipe and valve. You will want to open the valve as well. Heat up the area where the valve joins the pipe. You can grab the valve with large channel locks or the like to see if it will move. If it does, it is hot enough to remove. You may find it easier to cut the pipe and pull off the valve, otherwise you may heat up a nearby elbow and give it some lateral movement.
Reinstalling the new valve requires that you clean, flux, and heat up the joints so you can solder them. If you have cut the pipe, you can use a repair coupling over the cut and solder that on just like the valve. Always leave the valve in the open position when applying the heat.
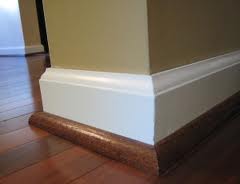 If you are installing a laminate floor and you aren’t going to remove the baseboard, you will need to span the gap with molding. The gap will be small but unsightly so you need to cover it. Quarter-round molding is small and is the customary molding to use, but really , any molding you like will work, so long as it covers the gap. Quarter round is simply a 90-degree angle with a rounded surface connecting the points (think of a circle cut into quadrants and that is the profile).
Installing the molding goes quickly with a nail gun and a power miter saw. I would start on a long wall and start installing the trim. It’s easy to mark the wood studs with a stud sensor, and then place a piece of painters tape at that location. So when you go to nail the trim, you know exactly where the studs are and you don’t have to waste any time. When you come to a corner, miter the corners and place a nail in close proximity to the corner on each piece. Press the nail gun into the corner on the trim to hold it in its final place and then squeeze the trigger.
When you are done, you will have the original baseboard with a small ¾” piece of quarter round trim along the bottom of it all around the perimeter.
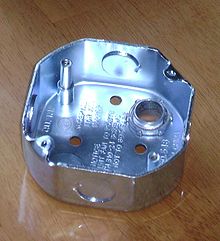 Junction boxes are the safe way to connect electrical wires. They have clamps that hold the cables and then the wires are connected once the sheathing is stripped from them. The box provides room to make connections as well as providing protection from the connections being hit or pulled.
Home inspectors see this often. Up in an attic a homeowner may have done some work and it can be downright scary. There are no junction boxes or even wire nuts used to twist the ends of the wires together. Plenty of people rely on electrical tape to do the job of wire nuts and junction boxes. This is scary because without solid connections, you can get heat and possibly a fire.
A junction box is secured to the framing or wall and then the cables are secured to the junction box with either cable clamps, or integral clamps built into the box. This will prevent movement of the cable. Electrical tape does not offer this. People usually don’t go in the attic much, but when they do, they can disturb the cables by tripping over them or by moving insulation, etc. Junction boxes can withstand some stress placed on the cables, but electrical tape will typically give and allow the connections to weaken and possibly separate.